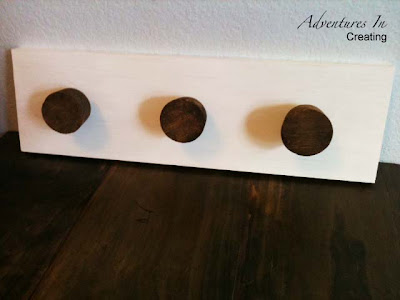
Ugh I give up. Seriously I wasn't sure what else to title this besides the obvious so there it is. And, you may be thinking- "Geez how many coat racks does this girl need?" Truth: I sell most of this stuff in a little store here in Town- Dora Lou's Place. If you're ever in Altus, OK come check it out!
Anyway I found these guys while we were in California a few weeks ago. While the Hubs was off wine tasting my preggo self and and the Con-Man hung out outside. That's when I happened upon these wine barrel stoppers:
I asked someone who worked at the winery if I could have a few. Maybe he felt sorry for me in my pregnant state because he said "Sure take a few." Mmmm- Ok! (See you can have fun wine tasting while preggo.)
I have a few ideas for them, coat rack is the first up! Check it out!
I started by sanding them down just a little. I like the rough look; I mainly did this to smooth out any splintery edges and get any excess dust off.
I started by sanding them down just a little. I like the rough look; I mainly did this to smooth out any splintery edges and get any excess dust off.
Then I went to the hardware store and bought some 2" Dowel Screws. I figured this was a good length to securely fasten my stopper to the wood and leave some room for the decorative metal rod.
I centered my pilot hole on the stoppers and measured out equal distance on my wood backing.
The next step was painting and sealing. Then I screwed my dowels into my pilot holes.
The next part was a bit tricky. I wanted a decorative metal surround to go in between the wood backing and the stopper. I checked out our local hardware store for metal piping and rods. It seems like if metal rods are going to be hollow the smallest they come is 1.5" thick- to big. Anything smaller was solid.
I thought I had hit a wall. But a trip to my local Walmart saved the day. Curtain rods! Of course! They are thin and hollow- yay! I bought the smallest tension rod I could find and it was only $2. Score!
I cut it down to the size I needed. This took a bit of guess work; my first measurement of 1" was to long. Second attempt was 3/4" and that seemed to work fine. I measured the rest out and cut them down to size with my scroll saw.
(Bad picture of me working in the garage)
Finally I screwed on my stoppers~
And the final product:
What did you work on this weekend? Did everyone have a happy Mother's Day?


9 comments:
good eye, and good project!
You come up with the cutest ideas! I never would have thought of this!
That's so creative Rachelle!! Great idea, love it!!
Very cute idea!
Dee
I love the rustic look of it. Very creative with the curtain rods. It looks great.
I love the rustic look of it. Very creative with the curtain rods. It looks great.
Great idea, very cute!
What a wonderful idea! I love the look! Thanks so much for linking up to the All Star Block Party!
Holly
What a clever idea... thanks so much for linking up to the ALL STARS BLOGGING BLOCK PARTY ...
Can't wait to see what you do next.. =)
Carri
simplydonewright.blogspot.com
Post a Comment