Sunday, January 30, 2011

Seek and Ye Shall Find

Good things come to those who wait. Patience is a virture. Never run after a bus or a man, there will always be another one.
All these saying are so true!  What am I talking about? I'm talking about MY NEW DINING CHAIRS!!!


After many months of no options, disappointments, and starting to think I'd never find them I did! A whole set, 4 chairs and a table for $230. Not to bad!


Finally! After almost 3 months when the great search began (which you can read about here, here, here, and even here!) I've finally completed my set. It was a harrowing adventure full of danger and excitement.

It all started when I ran over to my favorite Mid Century shop The Oz to see if the owner had found any chairs for me. (He had been on the lookout since I bought the first 2 from him. The guy knows me and Con-Man by name sad but true.) This time he had something to show me. Yay! He said I could take one home to try out and see if I liked it.

Well on my way home I stopped at a store a friend told me about- Furniture For A Cause. I thought I would pop in and guess what I found? A whole dining set in the style I was looking! Two great finds in one day!


Pretty exciting right?

Well here's where the real excitement begins. The set wasn't marked so I went to find a sales person. While I am doing this who do I see? The business partner of the guy who owns The Oz! He was looking at the set to buy and sell in his store! He also had a salesmen with him and they were looking for a price tag as well.

I quickly explained to my sales lady the situation and she sprang into action. She quickly walked me over while loudly explaining the "on hold" process while the Oz store owner and his salesman were walking up past us to register to find a price.


She put my hold tags on it just as the other guy was coming back to hang his. Phew! That was close! I ended up buying them that day in case there was any question on who actually saw them first.

You may remember that I wasn't looking for a whole set, just chairs. They couldn't separate the set which I was disappointed about. But the price was so good and the set was in such good condition it was worth it. I may try to sell the table later, we'll see.


Here's one of the new chairs with it's chair cousin.

The owner of the Oz told me "Hi." as I was checking out and told me he was glad I got the set since I had been looking for so long. I felt kind of bad buying the set right out from under the nice guys from the Oz especially since they had let me try out one of their chairs at home, but all's fair in love and thrifting.


Thursday, January 27, 2011

Fabulous Reader Questions

I received an email from a reader with a great question about my recent ceiling fan revamp:


Loved your finished look on the ceiling fan update.  A question...how did you keep the paint from getting into the fan parts?  I'm wondering if it would be easier to use a brush-on paint to avoid this problem?
I have at least 4 fans that I plan to attack soon.
Thanks!
Kim in IL


Great question Kim! I actually hadn't thought about how the paint might affect the fan motor (I usually get an idea in my head and just go for it which can be a good or bad thing). I hadn't turned on the fan since I painted it since it's been cold.


But I'm happy to report I turned on the fan for a good while this evening just to see how it did and it's working fine. I also inspected the inside of the motor and it didn't look like much paint got through the holes at all. So apparently my old fan was ugly but it's still in great shape. I hope this encourages anyone who was hesitant about trying this to go for it!


And for anyone who missed it here's a before and after of the fan in question:


And while we're on the topic of question and answer I received an email from Mary who saw my post on the Anthro Inspired Cupcake Holder made by my friend Samantha. She was wondering what I thought about using super glue instead of Gorilla Glue like Samantha suggested. Since I had not tried the project myself I unfortunately did not have an answer for her. But she tried it herself and had some insight for me that I wanted to share with you:


Hey Rachelle,

I commented on your blog a while back about using the hot glue on the cupcake stands.


I wanted to update you on the results of the hot glue. It did NOT work! Heh. The plates instantly stuck together once they touched making it impossible to make adjustment. It seemed like the glue was going to hold, then three days later they all pulled completely apart. I had to start all over and super glue them. So, I should have listened to you and definitely done it right the first time. :)


Thanks for your response!


Mary


Thanks for the tip Mary! I thought hot glue could have been an option but I guess not! Thanks for the advice.

If anyone else has questions about some of my projects please feel free to ask!

Monday, January 24, 2011

DIY Closet Shelving

Lately a lot of the blogs I have been reading have focused on organizing for the New Year. The CSI Project had a whole contest on it and over at The Brooklyn Limestone she is showing off people's revamped junk drawers.


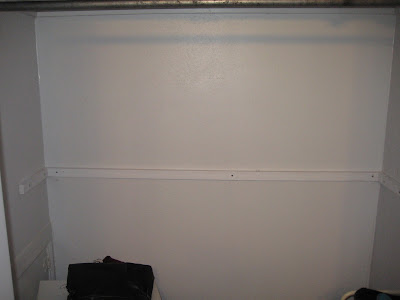
All this organization got me thinking about my dysfunctional closet I mentioned in an older post about our 1930's home. I meant to get to it ever since we moved in but it was a project that I put on the back burner. I feel like the only way for you to understand just how bad the situation is, is to show you a before picture.


Viewer warning, the image you are about to see may be disturbing to some readers!


AUGH! I'm so embarrassed! Piles of t-shirts from sorority/ college days, purses and bags on the floor, shoes scattered everywhere, to many clothes in a small space. Please don't judge me; look what I've been working with here.

So to remedy this sad situation I decided to add a third shelf to hold my bags and purses and a second rod for pants and skirts. I took my measurements and head over to my friendly Home Depot where I got all my supplies and had them do all the cutting.


I purchased a 14" wide board for the shelf, 2 1" x 2" strips to hold the shelf, and a wooden rod- all cut down to the size I needed. All my materials for 2 closets (mine and the Hubs) including paint was only $50. The most expensive item was the wooden rod. $3 per foot!

Anyway I got to work painting everything. I could have bought an already primed MDF board for the shelf but they were $15 each, I thought it was a little high so I bought the plain wooden ones. I just wanted to mention it in case someone wanted to skip some of the painting.

Once I got all the painting done it was time to take everything our of my closet and decide what to give away and what to keep.


Next for the actual hanging. I measured 42" off the floor and used a level to hang the first long strip of wood to hold the shelf, then screw on the two side pieces. This was the moment of truth; were those measurements I took while 18 monthCon-Man was trying to "help" me hold the tape measure accurate? 


Success!

Now was time to hang the rod. I measured the same 42" up then about 6-8" out in front of the upper rod. This is to keep the clothes on the upper and lower rods from getting all tangled in each other.


This part was pretty easy. I bought the rod hanger thingys, just 1 screw for each side and done! (You know, these things:


And now for the finished product!


Ok, I know it's still not the most beautiful closet in the world. Not like this one from Made By Girl but I can actually find my clothes, stuff is off the floor, the world is good again! And check out those neatly folded T-Shirts!

How is everyone else organizing for the New Year?


Sunday, January 16, 2011

Ceiling Fan Update

This weekend here in Texas it has been rainy and cold. Some people would be bummed out by this but I took it as an opportunity to get some stuff finished around the house. 


First on the list is the dated ceiling fans in our bedroom and in Con-Man's room. It's something I've been meaning to get to for a long time but have been putting it off.


I'm thinking late 70's early 80's? Anyway I didn't want to splurge on a new one since this one works well and we use it a lot in the summer time; so I thought I would bust out the spray paint and get to work.

I started by taking off the blades and globes and taped off the bulbs. I then taped around the top of the fan so I wouldn't spray paint the ceiling.


Old Globes. Blah...


Ready to paint!

I had to open all the windows to vent the room from all the spray paint but the end result was worth it. I choose a Krylon paint with Brushed Nickel finish.


I bought new globes at Walmart of all places- they were only $2 each! I also bought a new fan pull as well. I painted the blades white, they were originally faux wood with an odd pattern on them.


I think it turned out great! It only took about and 1.5 hrs for all the prep, painting and clean up. I did it all while the Con-Man took a nap! Not bad, and it cost about $15 for everything. I do want to buy some frost spray paint to cover the patten on the large globe, maybe I'll get to it tomorrow. ;)


I love a quick project that makes a big impact. Anyone else been working on a quick project this week?

**UPDATE! Several people have asked whether or not painting our ceiling fans was a good idea or not; because supposedly the paint can get in the motor and clog it or the weight of the paint on the blades will wear the motor down. In my experience it hasn't been an issue. We painted the fans and used the often for about a year. We have since moved and have been renting the house for 2 years and have not had any issues come up from our tenants. For me, painting the fans was not an issue. I figured they are at least 20 years old and if I can give them a quick update and for some reason the motor does give out al least I didn't have to look at an ugly fan for those years. The other option was spending lots of money on a new one right away. For me it was a win. Anyone else have an experience to share?**


And don't miss my newly repainted master bedroom!


Thursday, January 13, 2011

A Blank Canvas

While re-evaluating our Master Bedroom I wanted to share with you the origin of the painting we have on the wall.


Back in the day when we first got married and didn't have a penny to our name our new Master Bedroom in our first home had bare walls all around. I wanted something up there but neede something that would fit in our miniscule budget.

Luckily I had some matching frames I had found when I worked at the mall. Our back door was next to Victoria's Secret and while they were remodeling their store they had thrown these away:


They were originally gold so to make them match our furniture I simply spray painted them silver.

I then cut out some cardboard to fit the size of the frames, alid some batting over it, then used sheets from my old bed as the canvas. I tried my hand at modern art by tracing several sizes of plates in an interesting pattern and painted them different shades of blue.


Not to shabby for a free project! But as proud as I am of my thrifty-ness I think we could do with a change.

Anyway- Sheets make great canvases if you want to make large scale art work on your own. I used them for these pictures in Con-Man's room.


You can use Gesso to make the sheet hard like a canvas or just use several coats of white paint you have lying around and paint over that.

And this weekend I'm trying to decide which to tackle first: painting walls or tackling the dated fans. Hmmm, which one which one?

Tuesday, January 11, 2011

Baby It's Cold Outside!

I am not one who enjoys cold weather- give me sunshine and 90 degrees and I'm happy. So with all this cold Texas weather we've been having I've been reluctant to go outside; running, hanging out on the deck, walking our dog, working on any projects that involve me going outside ect. This includes welding and most of the work I do with my Dremel. :(


What can I say I'm like a bear in hibernation.


So since I've been stuck indoors I've been looking around the house quiet a bit and have noticed a few things I need to add to my "To Do List"


First Off- I've neglected our Master Bedroom for some time now. It still have the original paint the whole house had:


It's a neutral color but pretty dark, especially since it's on the ceiling as well. I lighter color would look better. And I might do some work on the fan and try to update it a bit instead of buying a new fixture.

I also want to do some work with the small closet; add some shelving and make it more functional. People in the 1930's must have not had many clothes... See my post on our 1930's Home- a Love Hate Relationship for more on this.

Second is our sunroom. It's needs some paint too. It's that same dark color, not to sunny.


Maybe bring in some color? Some more fun?

And last but not least finish up our dining room. I need to find a new fixture and think about the console and table.


Hopefully adding things to my "To Do List" will motivate me to get more stuff done! 

How about you? Anything in your list to accomplish this year?


Friday, January 7, 2011

Here We Geaux!

We interrupt this desgin/ furniture making/ whatever is happening at the moment Blog to say:

GEAUX TIGERS!


We're headed up to Dallas this weekend for the Cotton Bowl to beat up  on some Aggies. Hope everyone has a great weekened!

Wednesday, January 5, 2011

Dining Chairs: A Life Journey

Ok, maybe the title of this post is a little dramatic and I'm sorry to keep bringing this up but it's really starting to get frustrating. Why can't I find a decent pair of chairs at a decent price? For real...

I guess I was extremely lucky to find these chairs for my future dining room for $30 and $80 respectively.


I've been scouring Craigslist in my city and surrounding areas trying to find chairs to finish the set, going to garage sales and thrift stores with no luck. It's like all the cool furniture has been sucked into some black hole never to be seen again.

I've resorted to searching Ebay in hopes of a deal but those people think very highly of their stuff if you know what I mean. Some examples:

This chair would be a good complement to the first one I found (for $30). Guess how much they're asking for this bad boy? $200! Not including the shipping. It doesn't even have a seat! Lame...


This little beauty doesn't have quite the sticker shock starting at $50. But even if no one bids on it the shipping will make it over $100 which isn't worth it to me.


This chair is a set of four made by a company called Farstroup. It would go well with the pair I found at a local shop. It must be some famous company I've never heard of because they are asking $550 for the set, not including shipping!


And this ONE chair made by Shelby Williams (some other famous company I've never heard of) selling for $250. At least shipping is included in this one.


And finally look at this. $200 plus $60 for shipping. Look familiar? Looks pretty similar to these lounge chairs I bought not to long ago. $35 for the pair!!!!!!!!


So what is the deal Ebay? Is your furniture made of gold or something? Do people really buy furniture off of here and pay the shipping costs? Because for me it's a deal breaker.

And a heartbreaker because I'm starting to feel like my grand plans for a new dining room are falling apart. I hate to start off the new year with a big pout face but can I get a break here?

And I promise this will be the last you hear about it until that fateful day I find the rest of my set!

Tuesday, January 4, 2011

I've Been Floored

There is a secret I've been keeping from you, and it lived in my living room. My old, ratty, could never get clean no matter what I did to it rug.


I've had it since college and it's been spilled on, partied on, animals sleeping on, ect. I've been embarrassed to have people over and I'm embarrassed to show it to you now.


I've been wanting to get a new one for a while now but haven't found one I liked in the price range I wanted to stay in. 

But this past weekend I finally lucked out! I went to a Homegoods store here in town and hit the rug jackpot!


Yay! New clean rug! It has the colors I was looking for (greenish to match the curtains, chocolate brown of the couch, tan, and even some blue in the mix.) But the price is what really sold me- It was originally $300 and it was on clearance for $99! Score!


I love it, and Con-Man loves it too- when I rolled it out he said "Oooohh!" then proceeded to run and roll all over it.


See him checking it out? And notice my still unfinished coffee table. I'll get to it one of these days but for now I'm just enjoying my new rug!

Hope everyone is enjoying the New Year!