Tuesday, September 28, 2010

Light it Up! Part Deux

While on the subject of lighting I thought I would share some chandeliers that have been inspiring me lately. I've been interested in lighting because I am dying to replace the fixture that is above our dining room. 

It's tragic, it's awful, I'm embarassed to show it to you. But I will since I know you won't laugh; too hard.


Augh ugly ceiling fan!!


Seriously, who puts a ceiling fan above the dining room table? If you had it on all your food would get cold. It's not even a nice ceiling fan. Our vintage house who has had a lot of owners so who knows who installed it. I think about changing it a lot.

So as usual I've been perusing websites looking for lighting inspiration.


Love this classic Possini White Flower Pendant light. It can work in so many spaces. 


Oooohh, look at this! Its the Coral Pendant from David Trubridge Co. I wonder how difficult it would be to try and make this from wood veneer. You could cut it out with an Exacto then fasten the pieces together. Might take forever, but might be worth it!


Speaking of wood veneer, check out this little beauty from lzf-lamps. It's the Agatha pendant. it seems like you can buy some wood veneer, cut strips and drape them around a bulb. 


I also like this Cloud Pendant from Fire Farm lighting. It's made of acrylic so I'm not sure how I would try to make it myself- it's nice to look at though. 


These lights are from the Charm collection from Gallery. You can find it at Leucos USA or try making one of your own. The designer ones are etched glass, but you can get a similar look with vinyl or frosted glass spray.


I threw this little guy in for fun. I've loved seeing all the mason jar lights I've seen around like this one at Kara Paslay or this one at 3 Sunkissed Boys. I'd love to make one of these myself one day.

What do you think? Do you think any of these are worthy of my dining room? ;)


Saturday, September 25, 2010

Video Tutorial

A lot of people commented on my wine bottle pendant lights that they are worried about cutting glass with the Dremel Tool. I totally understand, I was somewhat intimidated as well. But after doing some research online I found out that I was not the only one who was curious about the subject.


Here is a video I found that shows how to do it, what precautions to take, and what bits to use.

http://www.ehow.com/video_4800305_dremel-glass-cutting-tools.html


Here is another article about using the Dremel to cut glass.


Hope this is helpful, and remember to always keep safety first. If your not comfortable doing something it's ok to ask for help!


I also want to send a huge Thank You to Rachel at One Pretty Thing and Cassity at Remodelaholic for featuring my wine bottle pendant lights and technique to make your own T-Shirt. Thank you!!

Happy Creating!

Wednesday, September 22, 2010

Anthropologie Workspace

Woo hoo! 200 followers! Thanks guys, I'm so excited! 


For a follow up to my wonderings about who these people at Anthropologie are I did a little detective work. I'm not going apply for a job here or anything- I'm just curious about who is behind all this creativity. It seems that (and I could be wrong) that each store has their own designer that comes up with the displays. Their main head quarters is in Pennsylvania at an old Navy ship yard that was converted for their use.
Check out this article that tells all about the headquarters for Anthropologie, Urban Outfitters, and Free People. With such a cool workspace no wonder they have such amazing merchandise! See some of the pics below:


Having a meeting


Styling it up!


What an awesome space to work in! Check out those columns, can I live here?


I love how it is so open and bright.


Merchandising? Look how they are reusing that concrete structure- how resourceful.

And check out this article from the architects who designed the space. They talk all about the history of the building and have lots of floor plans. They also talk about how they saved and refurbished most of the original elements of the building. Love this!

I thought it was pretty cool to see where all the beautiful clothes and furniture come from.  What do you think?

Saturday, September 18, 2010

Reconnaissance = Fail

So I finally went to Anthropologie for my future coffee table reconnaissance mission. And it was a failure!


Apparently they don't keep most of the furniture they sell in the store. I guess I never noticed before. I mean they have beds and dining tables, I just assumed the coffee tables would be there as well.

They are not. The girl told me I could buy one or hope that someone ordered and returned one. Ya ok... So I'll just have to study the picture and hope for the best.

But not to fear- the trip was not a complete loss!


Most people go to Anthropologie for the clothes, I got for the furniture and displays. For an example check out my friend Samantha's Anthroplogie Inspired Cupcake Stand.


Cool bench made out of stool seats!


You could make something like this yourself.


Everything is so unique and interestingly put together.


This display is made out of paper cups, napkins and plates.
Wouldn't be cool to be the person who came up with all this?


Friday, September 17, 2010

Light it Up!

Finally! I finished my secret project I have been working on that involves that light kit I got from Ikea I've been talking about for the past 2 weeks. I decided that it was time to replace my star lamp that I wired long long ago:


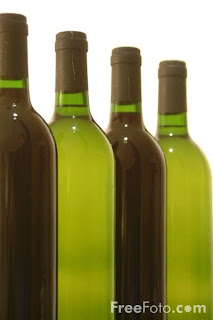
I still like it and will probably find another home for it but I have been itching to make a light out of one of these:


I know what you're thinking- wine bottles again! What is the deal with this girl? Well I ended up with quite a few of them after I made my wine glasses and citronella candles; I told everyone I knew to save their wine bottles for me and I now have a pretty good collection. So I had to do something with them!

So I came up with this:


Like them? I love them! They are my new favorite project I have done. Want to make some of your own? You can!

All you need is:
Wine Bottles (I used the large ones)
Dremel tool with Diamond Cutting Wheel and Grinding Bit (Or a wine bottle cutting kit)
Pendant light Kit
Plug
Safety Goggles

First I soaked my wine bottles in warm soapy water to take the labels off. Then taped off a section on the bottom and drew a straight line along the tape. This indicates the line I am going to cut along.


Next I was ready to cut. (Remember to wear safety goggles and a mask!) Using the Cutting Wheel of my Dremel I cut along the line I had drawn on the tape. 


Take your time and let the tool do the work. If you apply to pressure you'll just wear down the Diamond Cutting Wheel faster, but you won't make your progress any quicker. (Trust me I tried!)


Making some progress! I like to keep the tape on the whole time to keep any glass shards in check. Also remember to periodically dip the Dremel in water and spray some on the glass to keep both from getting to hot. The Dremel can over heat and the glass could crack if not. 


Yay success!! Next you'll use the Grinding Bit for the Dremel to smooth out any rough edges.


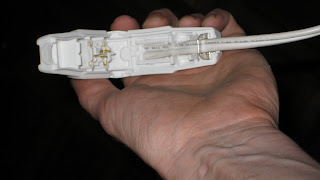
Once your are done with this step you can use the polishing bit to make the edge extra smooth and shiny. Once your all done it's time for wiring! I had 2 different wiring kits, the one from Ikea and the one I already had.  I was hoping I could just slip the plug through the neck of the bottle and be done with it but the plug is to wide, so it was off to plan B (and C). The wiring kits were different so I had to use two different ways of wiring the bottles.


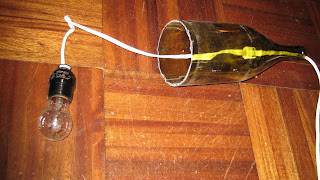
For the first one I was able to  take the light housing apart, being sure to keep everything in the same order. Once I had it all apart I just ran the wire through the neck of the bottle, then put the housing back together.


Once it was run through I tied a knot in the wire so the bulb would hang inside the bottle in the position I wanted.

For the Ikea light kit I couldn't figure out how to take the housing apart, so I had to resort to other measures. I had bought a wireable plug from Home Depot and used that.


To attach the wire to the new plug, I had to cut the old one off. Then I ran the wire through the neck of the bottle.


Then just run the wire through the slot of the plug and snap it closed. Done, easy! Now you're ready to light it up!


I love the light they give off! (I'll have to paint the wire the same color as the wall this weekend!)


A few close ups:


And one shot of them off:


So what do you think? Do think this is something you would want to make?

Linking up to:
thecsiproject.com.png

Tuesday, September 14, 2010

Article of Interest: Finders Keepers

I receive these emails from Sherwin Williams STIR Magazine. Most of the articles are interesting and have good information.


This article in particular caught my eye and I wanted to share it with you:

http://www.swstir.com/color-smarts/article/finders-keepers/

It's all about how decorating with found objects is coming back in style. I didn't know it had ever gone out of style! I'm glad more people are recognizing the value of repurposing, both to save money and to be more "green". It's also a great way to add something unique to your home that shows you personal style.


I'm also a little bummed because it seems like those who are selling also recognize the value of their goods. It seems like some things are so expensive- at the thrift store! Maybe it's just the ones by my house?

What do you think? How do you feel about this new rise in the value of junk? Have you always been a "Finder Keeper"?

Sunday, September 12, 2010

Weekly Wrap Up

I hope everyone is having a great weekend! We've been fairly low key over here, but I wanted to send a big shout out to the following ladies for featuring my  DIY Patio Furniture last week:


http://www.casasugar.com


http://www.superstinkyboys.blogspot.com/


http://simplydesigning.blogspot.com/


http://www.domestically-speaking.com


Next week I'm working on something that has to do with this:


I posted about it last week after my Ikea trip. Any guesses of what it's going to be?? 


In the meantime I'll leave you with some eye candy:


I really have a thing for chairs, and I think this one from Loll Designs is really cool. Bright color and looks pretty comfy too. I found this image at Interior Design Magazine's 2010 Spring Market Tabloid Seating. See all the chairs the editors choose as newest in design at Interior Design Magazine

Have a great week!!

Friday, September 10, 2010

Showing Our Spirit

Something you may not know about me; I am a HUGE football fan! This is my favorite time of year, not because of cooler weather but because of football. My favorite teams are my LSU Fighting Tigers and of course my Black and Gold Boys the Saints!


It was a big deal last year when the Saints went to the Super Bowl for the first time (And WON!). We were invited to a Bowl watching party and I wanted to represent my team. But since we live in San Antonio now there was no Saints gear to be found. So I had to resort to making my own:


Now it's football season once again. Mine and the hubs' shirts still fit, but little Con-Man has grown out of his Saints outfit. So I thought I would make one for him similar to ours using the same technique.

(If you don't share a love for the Saints you can use this technique to create any kind of shirt! I made a bunch for my sister Bachelorette Party.)

I bought him a black T-shirt from Walmart and using Word I typed up the image I wanted then cut it out using an Exacto knife.


Once I had everything cut out I centered it on the shirt front and taped it down. I also slid a magazine inside the shirt so the paint wouldn't bleed through to the back.


Using a short stiff brush I used fabric paint to transfer the wording. 


I did two coats of the gold paint since the first coat didn't show up well over the black fabric. Then I used white puff paint to highlight some of the wording.


This technique is pretty easy, I was able to get the first coat done while Con-Man ate his dinner.

(Gratuitous Shot of Cute Baby)


Front all done:


Here he is wearing it:


I also did a design on the back using the same technique:


So anyone else excited about football season? Do you think you could use this technique for another purpose? I'd love to hear about it!