I still like it and will probably find another home for it but I have been itching to make a light out of one of these:
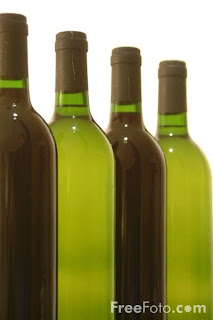
I know what you're thinking- wine bottles again! What is the deal with this girl? Well I ended up with quite a few of them after I made my wine glasses and citronella candles; I told everyone I knew to save their wine bottles for me and I now have a pretty good collection. So I had to do something with them!
So I came up with this:
Like them? I love them! They are my new favorite project I have done. Want to make some of your own? You can!
All you need is:
Wine Bottles (I used the large ones)
Dremel tool with Diamond Cutting Wheel and Grinding Bit (Or a wine bottle cutting kit)
Pendant light Kit
Plug
Safety Goggles
First I soaked my wine bottles in warm soapy water to take the labels off. Then taped off a section on the bottom and drew a straight line along the tape. This indicates the line I am going to cut along.
Next I was ready to cut. (Remember to wear safety goggles and a mask!) Using the Cutting Wheel of my Dremel I cut along the line I had drawn on the tape.
Take your time and let the tool do the work. If you apply to pressure you'll just wear down the Diamond Cutting Wheel faster, but you won't make your progress any quicker. (Trust me I tried!)
Making some progress! I like to keep the tape on the whole time to keep any glass shards in check. Also remember to periodically dip the Dremel in water and spray some on the glass to keep both from getting to hot. The Dremel can over heat and the glass could crack if not.
Yay success!! Next you'll use the Grinding Bit for the Dremel to smooth out any rough edges.
Once your are done with this step you can use the polishing bit to make the edge extra smooth and shiny. Once your all done it's time for wiring! I had 2 different wiring kits, the one from Ikea and the one I already had. I was hoping I could just slip the plug through the neck of the bottle and be done with it but the plug is to wide, so it was off to plan B (and C). The wiring kits were different so I had to use two different ways of wiring the bottles.
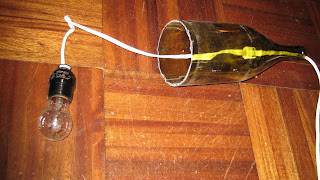
For the first one I was able to take the light housing apart, being sure to keep everything in the same order. Once I had it all apart I just ran the wire through the neck of the bottle, then put the housing back together.
Once it was run through I tied a knot in the wire so the bulb would hang inside the bottle in the position I wanted.
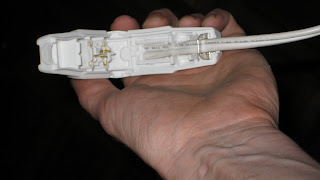
For the Ikea light kit I couldn't figure out how to take the housing apart, so I had to resort to other measures. I had bought a wireable plug from Home Depot and used that.
To attach the wire to the new plug, I had to cut the old one off. Then I ran the wire through the neck of the bottle.
Then just run the wire through the slot of the plug and snap it closed. Done, easy! Now you're ready to light it up!
I love the light they give off! (I'll have to paint the wire the same color as the wall this weekend!)
A few close ups:
And one shot of them off:
So what do you think? Do think this is something you would want to make?
Linking up to:


46 comments:
Hi! Jumping over from The Girl Creative. Great lights!! I love the look of wine bottles and am always trying to come up with projects to use them. This is really creative!
Tashia @ http://homeinspiredbliss.blogspot.
com
This looks awesome!! I just love the glow the bottles put off!
You are much braver than I am...I'm still scared to mess with electrical wires. ;)
I love how these turned out! Always wanted to decorate with wine bottles, but never have been brave enough to try and cut them! This looked do-able! Thanks for sharing!
I found your blog via The Shabby Nest Frugal Friday.
These are great! I'd love to do some in our future basement or out on our porch. Good job.
You.are.a.genius! Looooooove this project. And I love my Dremel too but haven't been brave enough to experiment like you. Thanks tons!
Really cute idea! I'm a fraidy cat to cut glass so that was a great tutorial. Thanks!
Donna
Wow what an awesome idea, great job, I'm over from Debbiedoos
Not too much you can't do, or do not at least try to do. I love those, great color too...really has ambiance. Thanks for joining me, and for the great tutorial. Have a wonderful weekend. Debbie
This is going to sound completely ridicules...but what are you doing with your star? I LOVE THEM, and maybe we could arrange a swap? heatherlegere at hotmail dot com
I really LOVE LOVE LOVE these lights and the ambiance it gives the room. If you want to hide the cords, here are some hints that may be helpful to you.
http://wwwbobbypinsboardwalk.blogspot.com/2010/04/designer-ie-master-of-disguise.html
Just a few tacks and some paint the same colors as the ceiling and the wall.
Congratulations on a wonderful projects and tutorial
Love this idea. This would be perfect for an out side patio or bar area too. Thanks for sharing.
Very creative!! I love these! They caught my eye over at Cottage Instincts!!
I love it! I'm so afraid to cut glass but you make it looks so easy or at least make me want to overcome my fear and give it a shot. Great project! I love the light they give off too!
Thanks for sharing your creativity in the DIY Show Off Project Parade!
Roeshel
I can't wait to share this with my mother in law. She's going to love this! Found you through Its So Very Cheri! Thanks.
Ooohh yes...this is something I would want to make! The tutorial was awesome - Thanks so much.
Very cool! Love the effect and would have totally been afraid to cut glass otherwise. Neat!
This is great! I am always nervous about cutting glass but it seems so easy. Awesome. I love it!
Popping by from Mad Skills monday! I am your newest follower :)
Popped over from Under the Table and Dreaming. Those are cool lights, glad to learn the cutting trick for the Drummel too. TY. I would totally love to do that with a purpley bottle. I love purple. =)
I love these! I can picture a large cluster of them over the dining room table!
O my goddness! I just lve these! I have always wanted to do something like that. Awesome job!
Thanks for the kind words everyone! As for cutting glass it is a little intimidating at first. Just use caution, be careful, and it should be ok!
What a great idea! You did a wonderful job.
Nicole
It turned out really cute!! I love that it's original and personal and adds such a nice balance of functionality and decor.
Great job!
Super good! We have a cabin in the woods in the wine country of NY. These are a perfect addition!
Thanks for posting!
Pink Velvet Bird
Cute idea Rachelle!
I love the green glass and the way they turned out!
You are super talented!!
Love your guts
mandi
Looks great! It'd be interesting to see this done with square bottles. And I could totally envision a martini-loving friend of mine doing this with Absolut bottles for pendants over a bar.
Very cool! I love this! Now I just need to get a dremel. :)
Visiting from the Strut Your Stuff party.
love it, could totally see it out in a backpatio where you have your evening wine too.
I love that, its brilliant!!! Thanks so much for linking up to gettin' crafty on hump day :)
I never knew wine glasses could look so pretty. Great Job!
Wow now that is thinking outside of the box! What a creative use of your bottles. Thank you for joining us at A Crafty Soiree! I hope you'll come back next week and link up again!
They look great! Good for you for taking on an electrical project. Wiring intimidates me so. Maybe some twine around the white cords to hide them and give it an even more rustic look?
You are so creative and quite a whiz with that dremel!
Fabulously fun lights; you did a great job! Thanks for sharing. :)
Such a great idea. There are so many pretty wine bottles out there too.
Wow you are so talented with the dremel. I always look forward to your posts.
Thanks for linking up
Cheri
Very clever use of the Dremel! Thanks for linking up the The DIY Project Party!
Amy
Rachelle - What a fabulous idea! I love the look. This would make such a great gift for a couple of wine enthusiasts that I know! Thanks so much for linking up. Hope you have a wonderful week. ~ Stephanie Lynn
This is super creative!! I love the use of wine bottle to decorate.
These are great! Our local wine bar has similar lights in the bathroom and I've been trying to figure out a way to copy them! Thanks for sharing!
Jen
Scissors & Spatulas
Wow, really cool and clever! Laurel@chippingwithcharm
Seriously WOW! So so crafty you are!! Love this diy! Turned out great
Delighted Momma
These are awesome! I have been wanting to make these for so long and never knew how. Thanks for posting the tutorial! Visiting from Tatertots and Jello.
Jenn @ Social Salutations
These are incredible! What a creative idea, I love how they turned out.
Very cool project!!! I love it.
Dee
Oooo la la!! I love it so much!! :)
Your newest follower onLinky/GFC and frequent visitor too :)!!!
Post a Comment