Thursday, September 29, 2011

Mid Century Sewing Table Turned Modern Desk

So have you entered my giveaway for the Dremel Saw Max? What?! What are you waiting for! You could totally win!


Anyway- Phew, long title but trust me it's will be worth the read. Remember last week when I was talking about how just because a piece of furniture was built for a specific purpose doesn't mean it has to live out the rest of it's life that way? Last week I turned an old beat up coffee table into a functional bench.

Well this week I'm at it again. This time with an old Mid Century Sewing table I picked up at a thrift store for 10 measily dollars. 


As I've said before I'm a sucker for Mid Century Design. I liked the style of the skinny legs, blond maple wood, and for $10 I couldn't pass it up. I don't need a sewing table I usually do my sewing on the kitchen table. And I suspect most people these days do the same or just don't have space in their home for one- hence the cheap price of this table.

So if I couldn't use it for a sewing table, what else could it be? A desk would be great! I could really use a little desk for our laptop. And Con-Man could use it when he gets older.

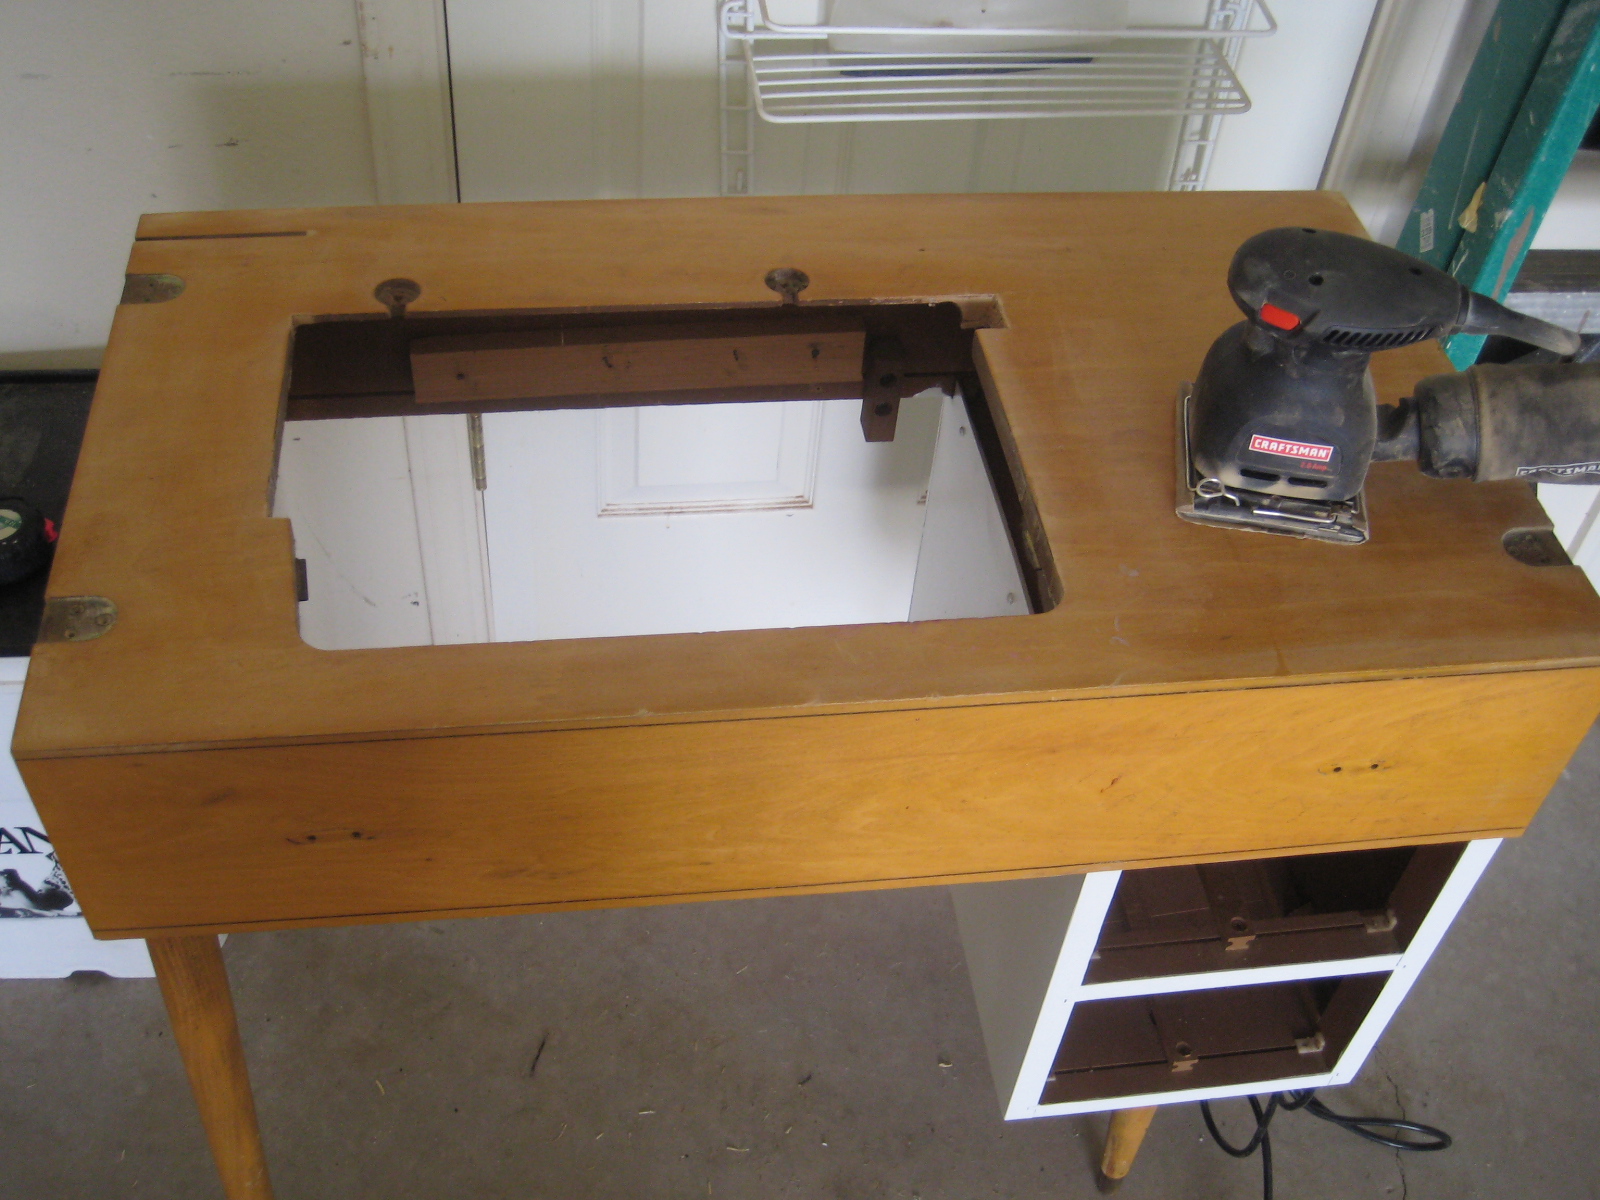
All it needed was a solid top. So I set to work unscrewing the fold out part. Then since all the sides were particle board, not maple like the drawer fronts, I sanded them down and painted them white. I used a Glidden 2 in one Paint and Primer- worked great!


Once that was finished I needed a wood top. This was going to be tricky~ I first went to the local hardware store and bought a piece of MDF and wood trim that I was going to cut down to size. 

BUT! The furniture gods were smiling on me this day. Because I happened to notice that the funky coffee table I had bought a few days before had a wood top. And it seemed to be the same width as my new desk.


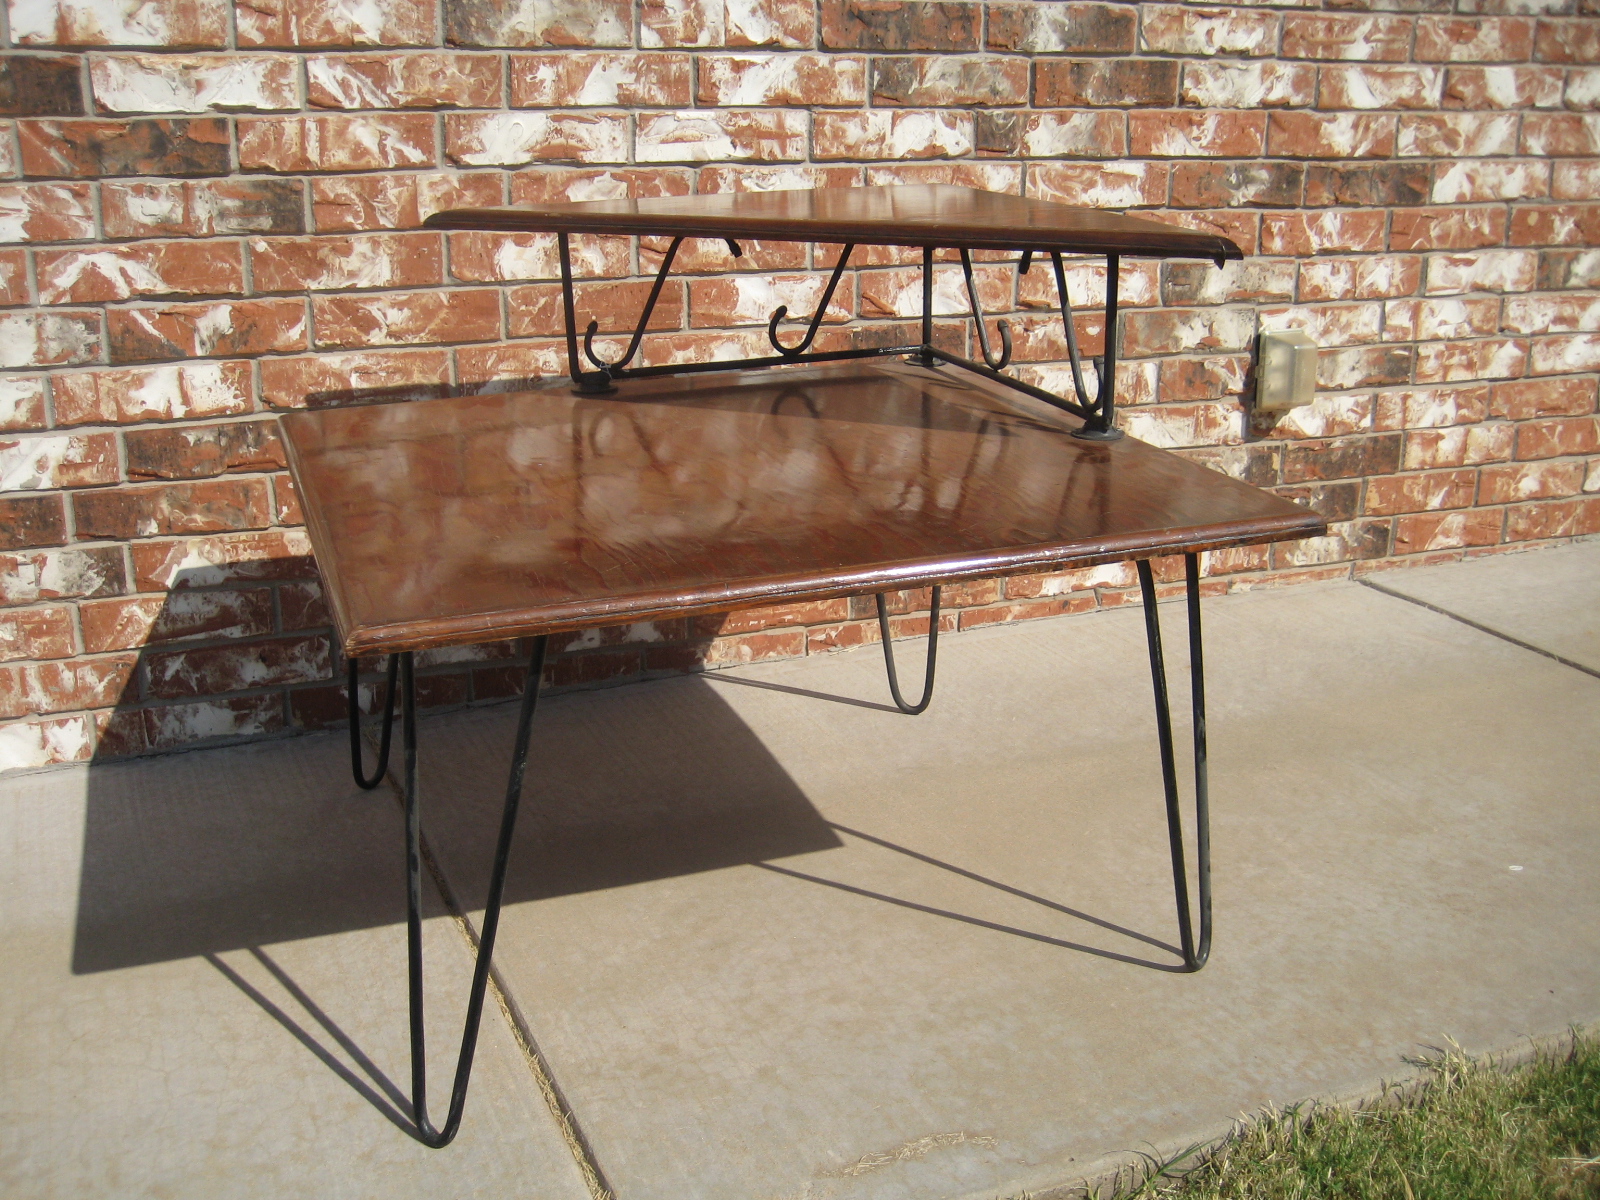
It seemed almost to good to be true but after a little measuring, remeasuring, and measuring again it was true!

So I returned the MDF and got started stripping off the thick varnish and sanded it smooth.


 I took it to the local wood shop on base (A great kept secret for any military peeps out there I'll share later) and cut it do the depth I needed for the table.


Next some more sanding. I sanded the top of the sewing table to prep it for glueing. I used Gorilla Wood Glue and some finishing nails to adhere the new top to the table base.


Then I painted the new top the same white as the base. And I spray painted the metal handles and tips of the legs.


(Sorry for the bad dark garage shots.)

Then Finished! This old Mid Century Sewing Table has a new life as a cool Modern Desk!


And I now have a place for my laptop, sketching, thinking~ whatever I please! And the best part is that it only cost me $10. Score!


So what are your thoughts? Will you think twice about passing up an old sewing table at the thrift store? I don't think I'll be able to pass up anything I "don't need" again!

Tuesday, September 27, 2011

Dremel NEW Saw Max Giveaway!

*This Giveaway Is Now Closed* Check back to see who the winner is!


Do you love Dremel Tools? Do you love HGTV and Chip Wade? Do you love giveaways?

If you answered "YES!" to any of the above keep reading because this post is for you!

If you haven't heard yet Dremel has partnered with the fabulous and oh so handsome Chip Wade from HGTV's "Curb Appeal: The Block" and "Designed to Sell" and you might have caught him on this season's "Design Star"; to help American's tackle their top "To Do Lists."


Each month Dremel and Chip release a new video guiding viewers through step- by step instructions and tool recommendations for tackling their to do list.

And, each Tuesday YOU can chat with Chip personally and ask him your burning DIY questions on Dremel's Facebook page! (That's today check it out!!)

Now for some exciting news you may have not heard about yet; Dremel is launching a brand new cutting tool; the Saw Max and you're the first ones to hear about it! That's right- win it before you can buy it!! All your friends will be jealous.


Dremel's new Saw Max is pretty amazing. It's a handheld saw that allows users to make precise, clean, straight cuts in a variety of materials (wood, plastic, drywall, even tile!) using a set of rotary cutting wheels. It's compact, ergonomic, precise, and versatile and easy to use. Move over bulky mitre saw- the Saw Max has come to town!

Check out this exclusive video of Chip working on a project using the Saw Max:


If you have already used Dremel products you know this one is going to be good. And if your ever looking for inspiration or ideas for a project check out Dremel's Website for lot's of project step by steps and videos. They're even having they're annual Pumpkin Carving Contest going on right now!

So, want to win one? All you have to do is follow the directions below!


To Enter:

1. "Like" Dremel on Facebook and mention Adventures In Creating on their wall (Leave comment below)

2. Follow Dremel on Twitter and tweet about this giveaway saying: I want to win @aicreating #DremelDIY (Leave comment below)

3. If you need some extra luck follow Adventures In Creating for a third entry and leave a comment below.

That's it! Easy~ I'm so excited. What are you waiting for? Good luck!!

Disclaimer blah blah blah: Giveaway closes October 4, 2011 and winner will be announced shortly after. This giveaway is only open to residents of the continental US and Canada, no PO boxes please. Only 3 entries per person. Please leave a valid email address. Winner will be selected by Random .org. Number of winners: 1

Note: I have not been compensated for this giveaway. I just love Dremel and want to spread the love around!

Saturday, September 24, 2011

Mmmm!! Apple Cake

So The Con-Man has been going to Mother's Day Out two days a week for a few weeks now. It's nice because not only does it give me some free time to work on projects it's good for him to get out of the house, interact with other kids his age, have some structure in the day, ect. And you know, it's nice for me to...


(Gratuitous Picture of Cute Baby)

This past Thursday it was my turn to bring snacks for the Kiddos. I just assumed that all kids ate mountains of food like Con-Man so I bought a bag of apples, some cheese and sliced them all up. Little did I know that all kids don't inhale food in the quantities my son does so needless to say there were more than a few apple slices left for me to take home.

Hmmm, what to do with a bowl of sliced apples? Make cake! 


I originally thought about making pie or tart but those all called for Granny Smith apples and all I had was Red Delicious. I found the recipe on Joy Of Baking. I choose it because not only did it look good,  had most of the init was easy to follow, didn't take long, and there's even a video to go along with it! It's the perfect fall dessert.

Ingredients:

3/4 Cup Chopped Walnuts or Pecans
1 pound apples (about 3 large)
1-2 tblsp lemon juice
1.5 cups flour
3/4 c sugar
1.5 tsp baking powder 
1 tsp cinnamon
1/4 tsp salt
6 tblsp unsalted butter melted and cooled to room temp
2 large eggs
1/2 tsp vanilla extract
2 tblsp mild
1/3 cup raisins (I didn't use raisins)

Glaze (optional)
1/3 cup apricot perserve or jam

Step 1.

Preheat the oven to 350 and place the rack in the center of the oven. Butter or spray non stick cooking spray on an 8 in square baking pan and line with parchment paper or wax paper

2. Place nuts on a baking sheet and bake for about 8-10 min or until lightly brown and fragrant. Remove from oven and cool on a wire rack then coarsely chop.

3. Peel, core, and chop the apples into bite size pieces. Toss with lemon juice.


4. In a bowl use a mixer to combine the flour, sugar, baking powder, ground cinnamon, and salt. Add the melted butter, eggs, vanilla extract, and milk and beat until fully incorporated. Fold in the chopped nuts, raisins, and apples.


5. Transfer the batter to the prepared pan and smooth out the top. Bake in preheated oven for about 35-45 minutes or until golden brown and a toothpick inserted into the middle of the cake comes out clean, Remove from oven and place on rack to cool.


6. While the cake is still warm, prepare the glaze. Place apricot jam in a small sauce pan and warm over medium heat until liquid. Remove form heat and strain the jam through a fine strainer to remove and fruit lumps. Or heat in the microwave. Use a pastry brush to spread the preserves over the cake.

7. Serve warm with whipped cream or vanilla ice cream. YUM!!


This cake turned out good and was pretty easy to make. Next time though I may not use as many apples as it calls for. Every bite was completely apple filled and I think I'd like less.

I hope you try this out and enjoy it as much as I did!

Have a fabulous weekend!

Wednesday, September 21, 2011

A Shout Out To White Rooms

I was looking through my Pinterest (Follow Me!) pics and I noticed something, I have a lot of white rooms on my boards. I was drawn to the rooms for one reason or another but one thing was the same- white. It really is a beautiful look- so pristine, clean and bright. I'd love to have a home that looked like these rooms.......but....


........But is it really practical? Who are the people who live like this?


I can't imagine having all white furniture, walls, and floors with a 2 year old and a big black lab in real life. (Both of who love to make messes in their own ways.) Do the people who live here have kids? If they do have kids are the children allowed in these rooms? Or is it a couple, or single person? 


I've heard people say that a white slipcovered couch is easy to take care of, just wash it or bleach it and your good to go. But do I really want to be washing my couch slipcover all the time? (Maybe I'm lazy?) Our current couch is chocolate brown microfiber- just try staining that sucker.

Any one out there in blog land have a white room? What's your secret to keeping it clean? How this is accomplished? 

I love the look but how to make it work? Am I stuck with my big brown couch till my kids move off to college?

Monday, September 19, 2011

Road Kill Rescue 3: Coffee Table

I'm back once again with the final installment from my "Road Kill" rescue series. As a reminder I found this group of furniture next to a dumpster outside a storage facility:


I mean, come on; who would through this stuff away right? It's like they say- one person's trash is another person's treasure.I already transformed the first two pieces, the Cafe Chair and Small Dresser. Now it was the Coffee Table's turn.

This thing needed some help. The legs were loose, the plywood top was splitting and pretty much ruined, and it was completely dirty. This guy was the worst off of the bunch and I could actually understand why someone threw it away. 


My initial thought was to remove the top and fashion a new one; build a frame with a mirror inside, make a nice wood top like my coffee tables, ect. But then I got to thinking- maybe this coffee table didn't need to be a coffee table anymore. It's lived out it's coffee table life of wet drink rings and food spills and now it was ready to become something else..... like a bench!


Yep, I decided that instead of going through a ton of work to make a whole new top I would just reupholster the existing one and give this piece of furniture a whole new purpose. After cleaning the table up and securing the loose legs I gave the frame a new coat of Rustoleum Heirloom White spray paint.


Then I cut a piece of upholstery foam to fit, laid it on top and covered with some old old old fabric I had leftover from a old project. 


Then I trimmed the excess and hot glued some trim to cover the staples to finish it off. Once everything was all freshly painted and finished I noticed that there was a crack in the wood. I used some Gorilla Wood Glue to fill it in and prevent it from splitting further.


Then it was finished! I have a new upholstered bench that cost me next to nothing to make. 


This goes to show that just because a piece of furniture is not functioning well as it's original purpose doesn't mean that it can't be reincarnated as something else just as functional and beautiful.


What kind of repurposing projects have you taken on?

Friday, September 16, 2011

Feelin The Fall

I don't know about everyone else but we've finally been having some cooler weather here in Oklahoma; and I've been loving it! I mean, when it's been 110 for 5 months straight I was reaching for my sweater this week when the high was only 80. It's really gotten me in the mood for fall, which in turn has me thinking of fall/ wintery decor.


When the seasons change making a few small tweeks around your home can really get you into the fall spirit.


A few chunky knit pillows really say cool weather is here. See how I made some last winter here>


Faux fur is a luxurious touch to help welcome cooler temps.


Switch out a light weight, brightly colored throw for a heavy wool one to keep warm on those cool fall nights.


Metallic items are big this fall. Scatter a few around the home, or make your own like Erica from P.S. I Made This did:


And of course bringing some nature inspired decor is always a hit:


Want to try this look on your own? Swing by your local grocery and pick up a few of the pumpkins and gourds they have out right now. It's a cheap and easy way to bring in some seasonal nature. You can even spray paint them up like I did last year. Or if your feeling extra craft try this cute nature inspired DIY I saw on Design*Sponge!


So even if the cool fall weather hasn't visited your side of the country yet there are still plenty of ways to try and entice it along. 

Have a great weekend everyone!