Did everyone have a fantastic weekend? We had some rain and hail here in OK but luckily it didn't last long and we were able to get outside and enjoy the Fall weather. And my LSU Tigers won so it was good times all around.
I was also able to get some rare wood shop time in. If you remember I posted a few weeks ago about scoring some scrap wood from the shop.


Showing posts with label scroll saw. Show all posts
Showing posts with label scroll saw. Show all posts
Monday, October 15, 2012


Sunday, February 26, 2012
F is for Family and...
Falcon!
I'v been slowly but surely working on our Family Photo Wall. I've been searching thrift stores for frames (I could just go to our local Walmart and buy some frames but the treasure hunt is more fun!). I've already started spray painting all the frames I have found the same color:

And last week we took a trip to the "Big City" and I got to go to Hobby Lobby! Oh it's been to long. I found this cute Fleur De Lis plaque for 1/2 off and bought it to go on our photo wall; since we're from Louisiana and all.

They also had some cute wall letters that made me think it might be nice to mix the Letter F (our last name initial) in the photo collage as well.

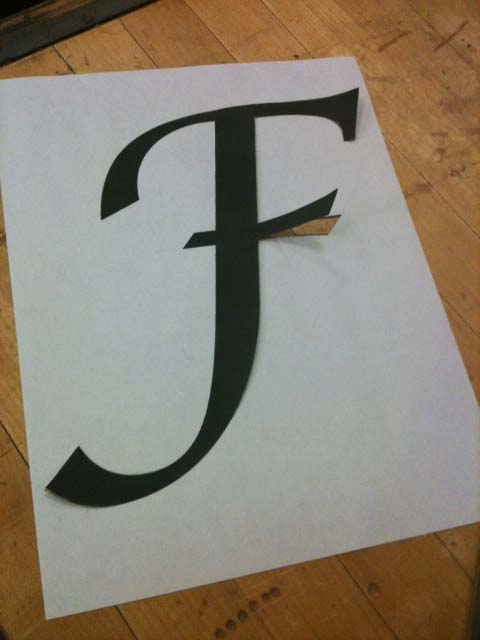
I created a Letter F Template and printed it out. If you want one for yourself you can download it here: Letter F
After cutting out my template I traced it on a scrap piece of wood then cut it out using the band saw at our local wood shop. If you want to try this project yourself and don't have access to a band saw a small scroll saw or jig saw could work. Or heck- buy one of the pre-made ones at Hobby Lobby! ;)


I'v been slowly but surely working on our Family Photo Wall. I've been searching thrift stores for frames (I could just go to our local Walmart and buy some frames but the treasure hunt is more fun!). I've already started spray painting all the frames I have found the same color:

And last week we took a trip to the "Big City" and I got to go to Hobby Lobby! Oh it's been to long. I found this cute Fleur De Lis plaque for 1/2 off and bought it to go on our photo wall; since we're from Louisiana and all.

They also had some cute wall letters that made me think it might be nice to mix the Letter F (our last name initial) in the photo collage as well.

I created a Letter F Template and printed it out. If you want one for yourself you can download it here: Letter F
After cutting out my template I traced it on a scrap piece of wood then cut it out using the band saw at our local wood shop. If you want to try this project yourself and don't have access to a band saw a small scroll saw or jig saw could work. Or heck- buy one of the pre-made ones at Hobby Lobby! ;)


Since I'm painting all the frames white and keeping the Fleur De Lis plaque gold I decided to paint the F a shiny gold as well since I'm bringing in some yellow tones into the room to contrast with the blue; but still trying to keep everything overall pretty neutral.

Ta-Da!
To complete this project I started by sanding down the wood to even out any rough edges.

Next I painted my base color. In this case a dark brown acrylic paint.

To give it an aged look I used a Weather Wood Medium from Americana Paints I was lucky enough to win in a contest a few months ago.

This was an easy process. Just paint 1 coat of the weathering medium, let dry, then brush on your contrasting top coat; in my case a shiny gold.


Now all I need is a few more frames, print some pictures and I think I'll be ready for hanging!
Did you do anything crafty this weekend? I'd love to hear about it!
Friday, November 11, 2011
Carved Wood Panels
Happy Friday Everyone! And Happy Veterans Day to all those who are serving or who have served our country! (Special shout out to the Hubs!)
Do you ever have this urge to finish something? Like it bothers you and you can't stop thinking about it? Lately I've been itching to get something hung on our walls in our living room. It's pretty bare, the curtains helped but I still had nothing on our walls. We've lived here almost 5 months- it's really becoming a problem. I mean a serious problem...

Hmmm, but what to do? Nothing was really catching my eye and I'm so indecisive! Ugh.. Then I remembered some wood panels I rescued from my old job before they tossed out.


Do you ever have this urge to finish something? Like it bothers you and you can't stop thinking about it? Lately I've been itching to get something hung on our walls in our living room. It's pretty bare, the curtains helped but I still had nothing on our walls. We've lived here almost 5 months- it's really becoming a problem. I mean a serious problem...


They're walnut veneer panels cut ~12" x 12". They were submittals from a design job- we were to approve which wood grain we wanted for the job, but after that they were no longer needed. They were to pretty to throw away so I took them home instead of throwing them out. (This is one of the things I miss the most about working at an Architecture firm- all the cool samples!)
Solution!! I decided it would be neat to cut a pattern out of them and hang them on the wall. I started with an image I liked (a rubber stamp I had lying around) then scanned it on the printer. Then I resized it in Photoshop and printed it out.

After printing the pattern I cut it out and traced the image onto my panels. I used just enough pressure to make an indentation that I could use to follow and cut out later.


My original plan was to use my Dremel Trio to route out the pattern. Fail! All was going well until my bit burned up and became un-useable. I think the Dremel Trio is great, I think that it wasn't meant for this purpose. :/ This was a little too heavy duty for it I think.

Anyway- I wasn't going to give up after this set back. So I made an appointment at the Base Wood Shop. If you are not in the military here's the DL- all bases have a craft and hobby shop. There's a ton of wood working machinery. Anything you can think of! And you can use any of it. I just took a short class on each of the machines and was good to go.
Thank you US Military! The guy who works at ours is really helpful to. He gave me suggestions on the best way to cut my panels and which order in which to make my cuts.

So I set to work on the Band Saw. I felt all Bad @ss with the big saw cutting out my panels.

The task was actually a lot easier with the Band Saw than with the Dremel. It was like slicing through butter even though my panels were almost 1" thick.


After a little sanding around the edges I screwed some picture hangers in the back and was good to go!

Viola! Free one of a kind wall art!


Some overall shots; I'm not sure if the panels are to narrow for the space I hung them in or not. What do you think?


If you wanted to try this on your own you could use plywood or MDF cut down to size. You could stain it or paint it any color you wanted. If you don't have access to a Band Saw depending on the depth of your wood and how intricate your pattern is you could use a scroll saw or jig saw instead.
Happy Weekend Everyone!
Saturday, June 26, 2010
Doggie Bookcase How to

A few people asked for more information about the Doggie Bookcase I made for Con-Man. I uploaded the templates I drew so you can print them out. Just click on the images to download them:
Template 1
There are 2 templates to print; one for the front half of the dog and the other is for the back half. They will each print on an 8.5 x 11 sheet of paper. Just cut each end out and tape the two sheets of paper together.
Once you download them and cut them out follow the instructions from the previous post (see link below). Good luck!
Doggie Bookcase
Tuesday, May 4, 2010
Doggie Bookcase
So I was thinking more about that scroll saw wasting away in the shed and thought I should do something with it. But what?? Well after some research I saw this super cute Elephant Bookcase on Design Public. I wondered if I could make something like it with the scroll saw for Con-Man.
 I don't know if Con-Man likes Elephants or not, but I know he loves Gracie, she's a dog, so maybe he likes dogs? After some thought I though a wiener dog might make cute bookcase.
If you think you'd like to make one of your own you'll need:
1 piece of Pine Board 7" tall (Try to look at a few and find one that is not warped and has few knots)
A scroll saw or jig saw with a fine blade
Wood Glue
Sand Paper
Paint and Pencil
I sketched an image of a wiener dog to the size I needed- approximately 7" tall by 12" long. Then I traced out the shape on a piece of wood. (Download the Dog Templates to trace here: Dog Bookcase Templates )
 My saw can't handle wood much larger than 1" so I traced the dog template 3 times then cut each out with the saw.

Once I had my 3 shaped cut out I glued them together with the wood glue and set it under some heavy books overnight to dry.
 Ta da! I then sanded it down with the attachment on the saw to smooth out the edges. (It didn't dry perfectly straight and since its my first time using a scroll saw I had some jaggedy edges..) If you don't have a power sander sanding by hand will work just fine but may take a little longer.
 Using some leftover paint I painted and sealed the bookcase. Check out the finished product in Con-Man's room:

 The wood was only $5 and this didn't take a incredibly long time, I just had to spread it out over a couple of days because of work and taking care of Con-Man. And getting the hang of the scroll saw wasn't that bad either. You can tell which was my first and last cut out. It might be fun to try some other shapes- a dinosaur, snail, strawberry. I'd love to see what other people come up with!
I don't know if Con-Man likes Elephants or not, but I know he loves Gracie, she's a dog, so maybe he likes dogs? After some thought I though a wiener dog might make cute bookcase.If you think you'd like to make one of your own you'll need:
1 piece of Pine Board 7" tall (Try to look at a few and find one that is not warped and has few knots)
A scroll saw or jig saw with a fine blade
Wood Glue
Sand Paper
Paint and Pencil
I sketched an image of a wiener dog to the size I needed- approximately 7" tall by 12" long. Then I traced out the shape on a piece of wood. (Download the Dog Templates to trace here: Dog Bookcase Templates )
My saw can't handle wood much larger than 1" so I traced the dog template 3 times then cut each out with the saw.
Once I had my 3 shaped cut out I glued them together with the wood glue and set it under some heavy books overnight to dry.
 Ta da! I then sanded it down with the attachment on the saw to smooth out the edges. (It didn't dry perfectly straight and since its my first time using a scroll saw I had some jaggedy edges..) If you don't have a power sander sanding by hand will work just fine but may take a little longer.Using some leftover paint I painted and sealed the bookcase. Check out the finished product in Con-Man's room:The wood was only $5 and this didn't take a incredibly long time, I just had to spread it out over a couple of days because of work and taking care of Con-Man. And getting the hang of the scroll saw wasn't that bad either. You can tell which was my first and last cut out. It might be fun to try some other shapes- a dinosaur, snail, strawberry. I'd love to see what other people come up with!
Subscribe to:
Posts (Atom)