Monday, June 20, 2011

Back to the Real World

Well we got back from our vacation last night and it was back to work today. WaWa...


Thanks for all the support, advice, and suggestions you guys left about my chair dilemma last week. I'm going to order the fabric, search out some other upholstery quotes, and if nothing seems within my budget I'm going to tackle the project myself. :)


As you remember we were in Acapulco last week. Yay! The hubs and I have a lot to celebrate in the month of June. His birthday is in June, now we have Father's Day to celebrate, and our wedding anniversary (5 years!) 


We had a blast hanging out by the beach and pool, eating local food, and just relaxing before our move to Altus, OK. Here are some pics!


We stayed at the Grand Mayan thanks to the AFVC (Armed Forces Vacation Club). If your in the military and haven't heard of it check it out- they have amazing deals!

Lots of beach and pool time!


When we weren't lounging in the sun we went out downtown to see the famous Acapulco Cliff Divers, ate some awesome local food, saw some exotic wildlife at a freshwater lagoon, and even experienced an earthquake.


It was a fun trip but we missed The Con-Man and were glad to be home yesterday.

And last but not least this week I'm working on the top for my coffee tables! Hoping to be done by the weekend.    
                                                                                 :D


Wednesday, June 15, 2011

Total Genius or Totally Insane?

Sometimes I take on a project or get an idea where I don't know if it's really a good idea or feasible. This is one of those times. 


I saw these chairs at one of my favorite thrift stores and liked them right away. They have a good scale, are comfortable, and have clean lines. After talking the guy down to $60 each I felt like I got a good deal.


After I brought them home though, my husband had different feelings. Usually when I bring home an old piece of furniture or some street side rescue all I get is an eye roll or a head shake and maybe a  "Here we go again." 

This time though, he told me I got ripped off! I don't feel that way- I think these chairs could be really awesome if I reupholster them in a leather look fabric like this:


The fabric I'm looking at is pretty inexpensive. But I got a quote to reupholster them and it was $350 per chair not including the cost of fabric! So maybe my husband is right, maybe I made a bad decision this time. 

I'm thinking about tackling the upholstery job myself. I've seen lots of bloggers take on this task themselves with great results. There are lots of videos online that show the basics. It would be a big task and I really hope I don't mess the chairs or fabric up. 


So what do you think? Did I make a huge mistake with the purchase of these chairs? Or should I look at it as an opportunity to learn a new skill and (hopefully) end up with some awesome lounge chairs?


Sunday, June 12, 2011

VACA!

Woo Hoo! Today we're leaving for our vacation today! We're dropping Con-Man off with the grandparents (sorry Con-Man, maybe next time) and headed to Acapulco!


We're ready for some fun in the sun and beach time after our bathroom remodel. And it will help us mentally prepare ourselves for the upcoming move!

But never fear- I've got a few posts lined up for the week so you wont miss me to much. ;)

Have a great week everyone!

Thursday, June 9, 2011

Bathroom Reno Complete!

Finally! After 2 years of living with this lovely yellow and brown flowered bathroom we finally have a new bathroom. If you don't remember let me refresh your memory of the beauty we used to have.


Not only was the decor bad 70's the tile was cracking in some places and the shower was leaking. So it was time for a change. Overall the reno took 5 days and only cost $1000 for materials and labor. Check out Part 1 and Part 2 here.

After those 5 days this is what we have now:


After everything was demo's we installed gypsum board on the walls instead of tile and Hardi Board for the shower surround instead of plaster.


We had our tile guy install 3x6 subway tile. This took 1.5 days for him to install with all the cutting involved. He said it would have been quicker and cheaper to install larger sized tile but I wanted the subway tile to go with the older style of the house.


To save money we grouted the tile ourselves. This wasn't hard to do but was a little time consuming. I just followed the directions on the box on how to mix and trowel it on. And to save an extra step I poured stain blocker in the grout as I mixed it so I wouldn't have to go back later and apply it.


Also to save cost we kept the existing penny tile floor. So after the tile walls were removed there was a gap between the new gypsum board walls and the old floor. I choose to install baseboards myself to cover up the gaps. It was the first time I had done it and I was praying I wouldn't mess it up to bad. Overall it wasn't that hard- I watched a few internet videos on installing crown molding and base boards and I was ready to go.


I just wish I had a mitre saw instead of just a mitre box!


Side Note: Liquid Nails (Which I used to adhere the baseboard and molding, is really hard to get off your nails!)


After all that it was time for paint! Instead of renting a machine that would blow texture on the wall I opted for a pour in texture. You just add it to the paint and roll it on as your painting. For me it works well enough since our bathroom is small but I don't think I'd want it for my whole house. The wall really does feel like sand it it made the paint thick and harder to roll on. But for a few dollars it was worth it for this project!


I had some hardware on hand that I had bought when the West Elm by our house for 60% off was going out of business. I thought I'd use it in our new home but since we're renting now I used it for the new bathroom here.


Overall I think the remodel was a success and I wish we had done it sooner!


What do you think? Major improvement or what?!

Linking here

Tuesday, June 7, 2011

Gitt'r Done!

Hello all! I was hoping to come to you tonight with a finished bathroom to show off- all sparkly and clean and new. But alas- there is still more to be done. I had set a limit on how much I wanted to spend on the remodel and we reached that limit on Saturday. So it was time to take on the finishing touches myself. Sunday I spent part of the day grouting tile and painting.


And last night as I sat on the floor of my bedroom trying to cut baseboards with a mitre box instead of a mitre saw (I really want one of those!! So Bad!) I wondered if it would have been worth paying the extra money to have these things done so I wouldn't have to be up past my bedtime covered in saw dust.  


But just as I was starting to despair the inside corner that I had cut for the baseboards actually fit together; my measurements were in fact accurate! I swell of pride and accomplishment was such a good feeling that I remembered why I decided to take on the rest myself. I love working on things with my hands and seeing a final result. I'll be able to say that I worked on a part of this bathroom no matter how small.

So with those thoughts in mind I leave you with a short post with the promise of a finished bathroom to be seen soon; to go and finish cutting the crown molding. Wish my luck, I'm going to need it!

Saturday, June 4, 2011

Some Progress

Lately all I've been focusing on is our bathroom reno. It's in full swing and nearing completion, I can see the light at the end of the tunnel (YAY!) But even though I've been knee deep in construction dust doesn't mean I've been neglecting another project I started a while back: My Coffee Tables!


I'll warn you this isn't the most exciting post ever but it was a neccessary step in getting these guys finished.


I needed to grind down the slag that was created when I welded the steel rods together the the ends would be smooth and finished.


I thought the grinding bit on my Dremel Tool would work for this job but it was taking for ever! I needed to bring out the big guns. Luckliy my neighbor had a ginder- that worked fabulously!


Once I got all the corners smoothed out it was time for painting. I used Rustoleum Spray Paint specially made to prevent rust. On the other tables I made I didn't use this type of paint and rust will seep out of the bottom exposed edges.


And Tu-Dah! Here are the tables looking fabulous. All they need now is a wood top and they are finished!


Oh and if your wondering how to keep a 2 year old busy while your grinding and spray painting a pool works wonders!


Oh and having a dog join in doesn't hurt either....


Oh ya, and I changed up my blog design. What do you think? I thought since we're moving to a new place it was time for a new blog header. My Do It Yourself sassy Pin Up Girl Header was fun but it was time for her to retire. She might pop up again- you never know. 

And- Yay it's the weekend!!!!

Wednesday, June 1, 2011

Ugly Bath Reno Pt 2

Our bathroom remodel is in full swing! It's a little inconvenient having dust all over our bedroom but it's going to be so worth it in the end. I think it looks better already! In case you don't remember what we started with here's a gentle reminder:


First we ripped everything down to the studs. We found that the leak had seeped into the walls which was causing the cracking tile; gross.


We also found some things that are worrisome. It looks like whoever did this reno back in the day cut some corners along the way.


The image above shows where the shelf was. There should be a piece of wood running across the top to support the studs and ceiling above. There's not...


When I saw that I felt like that guy on HGTV's Income Property when he finds something not to code and says- "We have to stop work right now!" Anyway we fixed it and it's all good now.

Next was gypsum board and Hardi Board. We had gyp laid along the walls and the water proof Hardi Board was laid in the shower. No more plaster and wire walls in this bathroom!


To save money and time we kept the existing floor. It's in good shape and was laid in concrete- so I didn't even want to try ripping it out. Plus the penny tile is reminescent of the older style of the house.


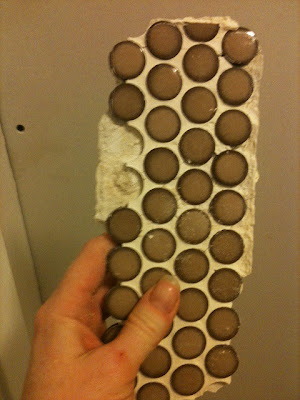
My original plan was to save the penny tile accent band to match the floor. We took it out very carefully but it doesn't seem that we'll be able adhere it back on the wall in sections like we wanted. 


If we want to use the tile again we'd have to take it all apart and put it back piece by piece. I'm not down with that- so we scrapped the accent band. I didn't see anything that matched the floor well enough to use.

We're laying the tile tomorrow and our bathroom should be back in business soon!!!