


*I'm doing this tutorial partly because I haven't done a full one in a long time. I am not trying to take anything away from people who sell these moons online. I did this project as a favor to a friend. By all means by one online because a lot of work goes into these babies!!*
You will need:
MDF board - enough to make 2 24" crescent shapes and some more for scrap
Pine 1x4 board- one piece should be enough
Wood screws
Wood glue
Jig saw
Circular saw or mitre saw
Drill
Drill Bits- 1/4" and smaller
1/4" dowels
First I cut my MDF down to manageable sizes with my circular saw. The moon I made was 24"x24" so I cut squares a little larger than that to work with.

Next I drew a circle. I measured out a 24" diameter and used my trusty pencil and string to draw the circle. Holding the string taught from the center and drawing all the way around- just like you may have done in grade school.

(This picture does not show my string tight but that is only because I am taking a picture with the other hand ;)
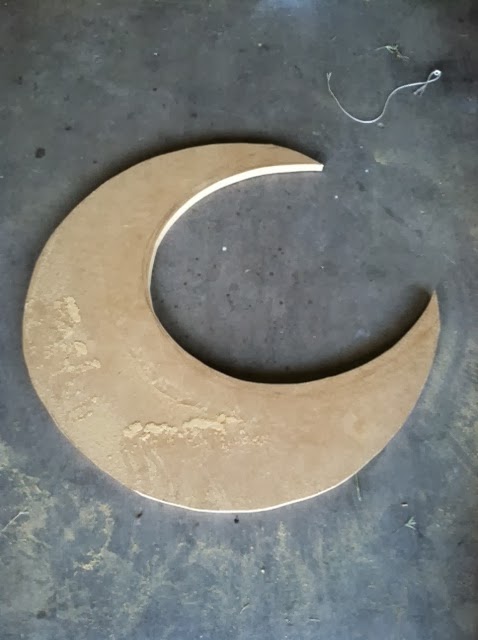
Then it was jig saw time! I cut out both circles.

For the crescent I freehanded the shape I needed. You could make yours fatter or skinnier depending on your preference.

Use your jigsaw to cut out your crescent moon! Trace the one you cut out onto your second circle and cut that one out as well.
Because I originally planned to make the moon prop collapsible for storage and transport I choose to go about attaching the center boards this way. And also because I did not want a lot of holes on the front of the moon that would have to be filled in later.
I used scrap wood and cut guide pieces to follow the basic curve of the crescent. These scraps would be what I would attach the center boards too.

I predrilled holes for the screws and used wood glue to attach these pieces. I placed them about 3/4" (the depth of the pine boards) from the edge of the crescent. This would allow the boards to be flush with the edge.
Screw the guide pieces onto each side of your crescent.

Next I cut my pine 1x4 board pieces. I made them 10" so that when all put together the moon would be about 12" wide. You can make yours wider if need be.
Then I dry fit them to see where I would screw the pilot holes for attaching the pine board. I marked the where the center of each pine board would lay and marked on the pine board as well.

Drill pilot holes in the places you marked. Then come back with your larger 1/4" drill bit and make those holes.

Fill the hole with a little wood glue and insert your 1/4" dowels. Wipe off any excess glue.

Next drill the 1/4" holes in your pine board on each end face. This is where your dowel will insert.

Here is a shot of the construction of the piece so you have an idea of how it will come together:

Lay everything out and see the mess you have made. And get as much help as you can ;)

Here is a shot of the center "box". You can kind of see it in the picture below. The is to help hold the moon together and creates a space to place a brick or something heavy to hold the moon up. It ended up being very top heavy. I also left 3 of the top boards to be removable so an older child can sit in the box and be popping out of the moon for their picture.

I made the box with 4 pieces of pine board also cut to 10". I attached 2 for each side screwing them in from the outside face of the crescent. These screw holes were later filled in with wood putty.


Now I mentioned earlier that I had grand plans of making the moon collapsible. When all was said and done even with everything attached it was a little wobbly. Enough so to make me nervous that it was too collapsible and would fall on the baby using it.
So I ended up glueing all the pieces together for safety. Kind of bummed but better safe than sorry. I included the tutorial in case someone with better wood working knowledge than me could figure out a way to make it stable. I gave it to my friend for painting.
All in all the project was a success and a fun challenge. My friend has been able to use it and I am so excited to see it in her pictures!!

3 comments:
Delightful!
That is truly amazing. You did a fantastic job Rachelle! Is there anyway I can subscribe to your blog by email? I have looked all over but can't seem to find where!
WOW. That is fantastic. And it looks so good in the pictures. Such an awesome prop. Great job.
Post a Comment