Showing posts with label fabric. Show all posts

Tuesday, December 3, 2013

Opinion Por Vor Vour??

So a few weeks ago I scored these awesome Mid Century Chairs for free! Jeah!!! (Anyone else watched that show- totally guilty pleasure)


I love the back of them- something I would love to have in my own home. You know, if I didn't already have an over abundance of chairs and a booth in a furniture shop to keep full. They are missing the seats but that's an easy fix.

Anyway- my problem is this:

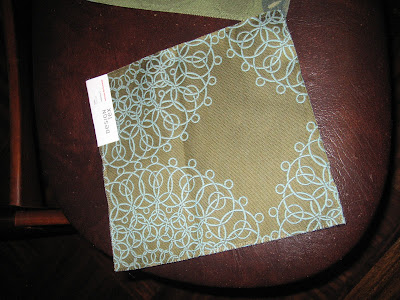
I'm not sure how to revamp them? My first thought was go bold! I have some bronze Modern Masters Paint I think would look really cool with these. But I didn't want them to be too crazy since I am reselling them. So I have some extra fabric on hand I thought would go well with the bronze:


But... is the fabric to traditional for the chairs? I like mixing it up but I'm afraid this might be a bad mix up.


Would the chairs be better with a simpler more modern fabric pattern? Should I still go for a metallic frame? I LURVE these chairs and don't want to screw them up. I find it hard to choose a design path when I don't know my end client.

Should I just go with my gut and do something I would like (Not necessarily the option above...)

Any advice is much appreciated!

And in closing- a picture of a cute baby :)


Stay warm everyone!!


Wednesday, November 14, 2012

Some More Bedroom Dreaming

I've been playing around with Olioboard lately. I had signed up for it way back in the day- like when it first came out- and never really did anything on it since.

Lately I've had ideas for our bedroom floating around in my head; and the only way to get my mind off something is to get it onto paper. Enter Olioboard~


Monday, October 8, 2012

Orange You Glad I'm Finished?

I sure am! I can't believe that I haven't shared this with you yet. I finally finished upholstering my orange chair! 

Remember these guys? These orange chairs I've been carting around since we lived in San Antonio?


You may remember that I took an upholstery class here in Altus in order to learn how to recover these bad boys.

Wednesday, October 12, 2011

Reupholstered Cane Chair

Ok- I am so excited to share this chair makeover with you! It was truly a labor (a lot of labor!) of love but the end result is totally worth it.


(I hope you don't mind that I showed you the Ta Da!! first.)


I found the dilapidated chair at the Goodwill a while back. An older gentleman was sitting in it and I thought he wanted to buy it- but when I asked him he said that he was just lounging while his wife shopped. Score!


It was tagged for $15 but I haggled for and got it for $10 (every dollar counts!). It had some problems of course. Torn, dirty fabric and ripped cane. 


I knew it had potential because I had seen Mandi at Vintage Revivals save a similar chair a while back. So I set to work taking the chair apart, starting with the upholstery first and being careful not to tear it so I could use it later as a template for my new pieces. 


This chair had some serious staples in it. Whoever put it together did not want it taken apart. I had to pull out the pliers and flat head screwdriver to get them all out. It took FOREVER!


There were some casualties.


But I triumphed in the end!!


The next task was taking the cane apart. And if I thought the upholstery did not want to come off, I was not prepared for this cane. Seriously- it was a beast. Good thing I took it outside because if was incredibly messy as well.


And when times get tough it's nice to have someone around to "help" you out.


Once I FINALLY got the cane off it was time for spray paint. I choose to paint the frame a glossy white.


Then I webbing back on. I was lucky to find some white webbing at our local craft store (Walmart). For better instructions on this part check out Mandi's blog.


Once that was finished it was time for upholstery. I had some fabric leftover from my Slipcovered Lounge Chair project that I thought would be perfect for this chair. I used a similar technique from when I redid my dining chairs. I traced the original fabric scraps onto my new fabric, leaving about an inch extra around the edges. Then stretched the pieces and stapled them into place to secure them.


To finish it off I hot glued fabric trim around the edges to cover the staples.


Then finished!

This project was good practice for the other upholstery project I have been trying to build up confidence for. It was tough but the end result was worth the hard work.


Yay!! What's the toughest project you have tackled? Was it totally worth the end result?

Linking here

Friday, February 25, 2011

It's Here! It's Here!

I've got a date this weekend. No it's not with my husband unfortunately he's working. It's with my dining chair fabric! It came in!


The hubs got home before me and didn't even tell me. I had to discover it on my own. Look at it leaning inconspicuously in the corner.


Even Con-Man is excited!


Hey Mom when are you going to reupholster my chairs?


And since I can't keep a secret the room I repainted it the sunroom! I'll have a post on the newly painted room for you to read about this weekend while I tackle reupholstering 6 dining chairs while caring a 19 month old. It's going to be awesome!

Monday, February 21, 2011

Dining Chair Fabric Decision

So as to not keep you in suspense an longer I've made a decision on Dining Chair Fabric! Thank you all for your input and suggestions. I was having a hard time deciding between the Teardrops and Spirals.


I went with the Teardrops!


I liked the contrast of color between the fabric and wood on the chairs, and from far a way it reads somewhat solid so I don't think I'll get tired of it. So it's on order and I can't wait until it comes in to reupholster my chairs!


Wednesday, February 16, 2011

New Dining Chair Fabric

Ever since I bought my new dining set I've been busy thinking about the fabric to reupholster them with. I need a fabric that looks great but will hold up to the ultimate test: an 18 month old's sticky food hands.


I began by looking at Crypton Fabrics. Liquid literally just rolls off of Crypton Fabrics. It is mainly used in hospitals where it can stand up to years of abuse. See how the water just sits on top and doesn't soak in? Awesome!


Then looked at fabrics that had stain resistant properties in them that protect against food and oils. These are superior to fabrics that just have a stain resistant finish on them because the stain resistance never wears off. A lot of them are environmentally friendly and look great!


Then ordered a ton of samples to check them out at home:


I narrowed it down to a few choices, mainly bold patterns in greens and blues. And cost of course was a factor...


Earthy Flowery Leaves:


Abstract Tear Drops:


Spiral Circles


Large Circle-y Dots:


Small Flowers:


So that's the final five. Any thoughts, opinions or suggestions??


Tuesday, May 18, 2010

Coming through in a Clutch


I was planning on using my new welder but some other projects took precedence. First, my sister's wedding was this past weekend! I was the Matron of Honor so I naturally had to get a bridesmaid dress. We had to have the dress hemmed and at the suggestion of my mom I asked them to save the leftover fabric for me; thinking I could turn it into a purse to match the dress. I thought this would be a quick project to get my creative juices flowing.


There was quite a bit of leftover grey silk fabric but not quite enough for the type of purse I had in mind. I remembered some leftover fabric I had from some chairs I had reupholstered and thought I could use that as the lining. So my purse could be sophisticated on the outside and funky on the inside. ;) Once I had gathered all my fabric I measured my wallet to get an approximate size for the purse. It was about 4" x 7" so I needed my fabric to be 5" x 8" wide for the seams and for any little mistakes I might make along the way.


Since the leftover fabric was odd cut out shapes (long thin strips about 5" tall) I had to cut and sew 3 together to get the size I needed for the outer portion. The above picture is after I has sewn the 3 together.


For the lining I cut one solid piece from my leftover upholstery fabric. I added a credit card pocket for convenience. I simply traced one of my credit cards, cut the fabric piece out, and centered it on the lining.

Then I sewed the silk and lining pieces together. It was looking a bit flimsy so I slipped some lightweight cardboard from the back of a spiral notebook in between them before I sewed it closed. I had to cut 3 pieces to size- one for the front, one for the back, and one for the flap.


Before I put the cardboard in the purse I had glued some magnets to the cardboard to act as a closer.


To finish it off I used a pin I had for decoration. It fit perfectly with the theme of the wedding which was in New Orleans. The purse matched my dress perfectly and I think I will use it again! It only took 2 nights after work to finish it up (most of that time was spent trying to remember how to use my sewing machine!). Now I'm tempted to hit up thrift stores and Marshalls to get old dresses and cut them up for this purpose!


It matched the bridesmaid dresses perfectly!


You could even do this with an old bridesmaid or prom dress you have laying around. Maybe you could use the fabric to make pillow covers or a clutch like this.

Linking up to Visit thecsiproject.com