I've been playing around with Olioboard lately. I had signed up for it way back in the day- like when it first came out- and never really did anything on it since.
Lately I've had ideas for our bedroom floating around in my head; and the only way to get my mind off something is to get it onto paper. Enter Olioboard~


Showing posts with label curtain rods. Show all posts
Showing posts with label curtain rods. Show all posts
Wednesday, November 14, 2012


Monday, September 3, 2012
Easy Breezy Dip Dye Curtains
Hello All! I hope everyone is having a great Labor Day Weekend!
I'm finally back with a DIY project to share with you. Way back in the day; when we first moved in to our rental here in Oklahoma, I shared our kitchen dining area with you in our house tour. I had a few ideas to spruce it up and succeeded in changing up the light fixture but progress stopped there.
Until Now! Check it out-


I'm finally back with a DIY project to share with you. Way back in the day; when we first moved in to our rental here in Oklahoma, I shared our kitchen dining area with you in our house tour. I had a few ideas to spruce it up and succeeded in changing up the light fixture but progress stopped there.
Until Now! Check it out-

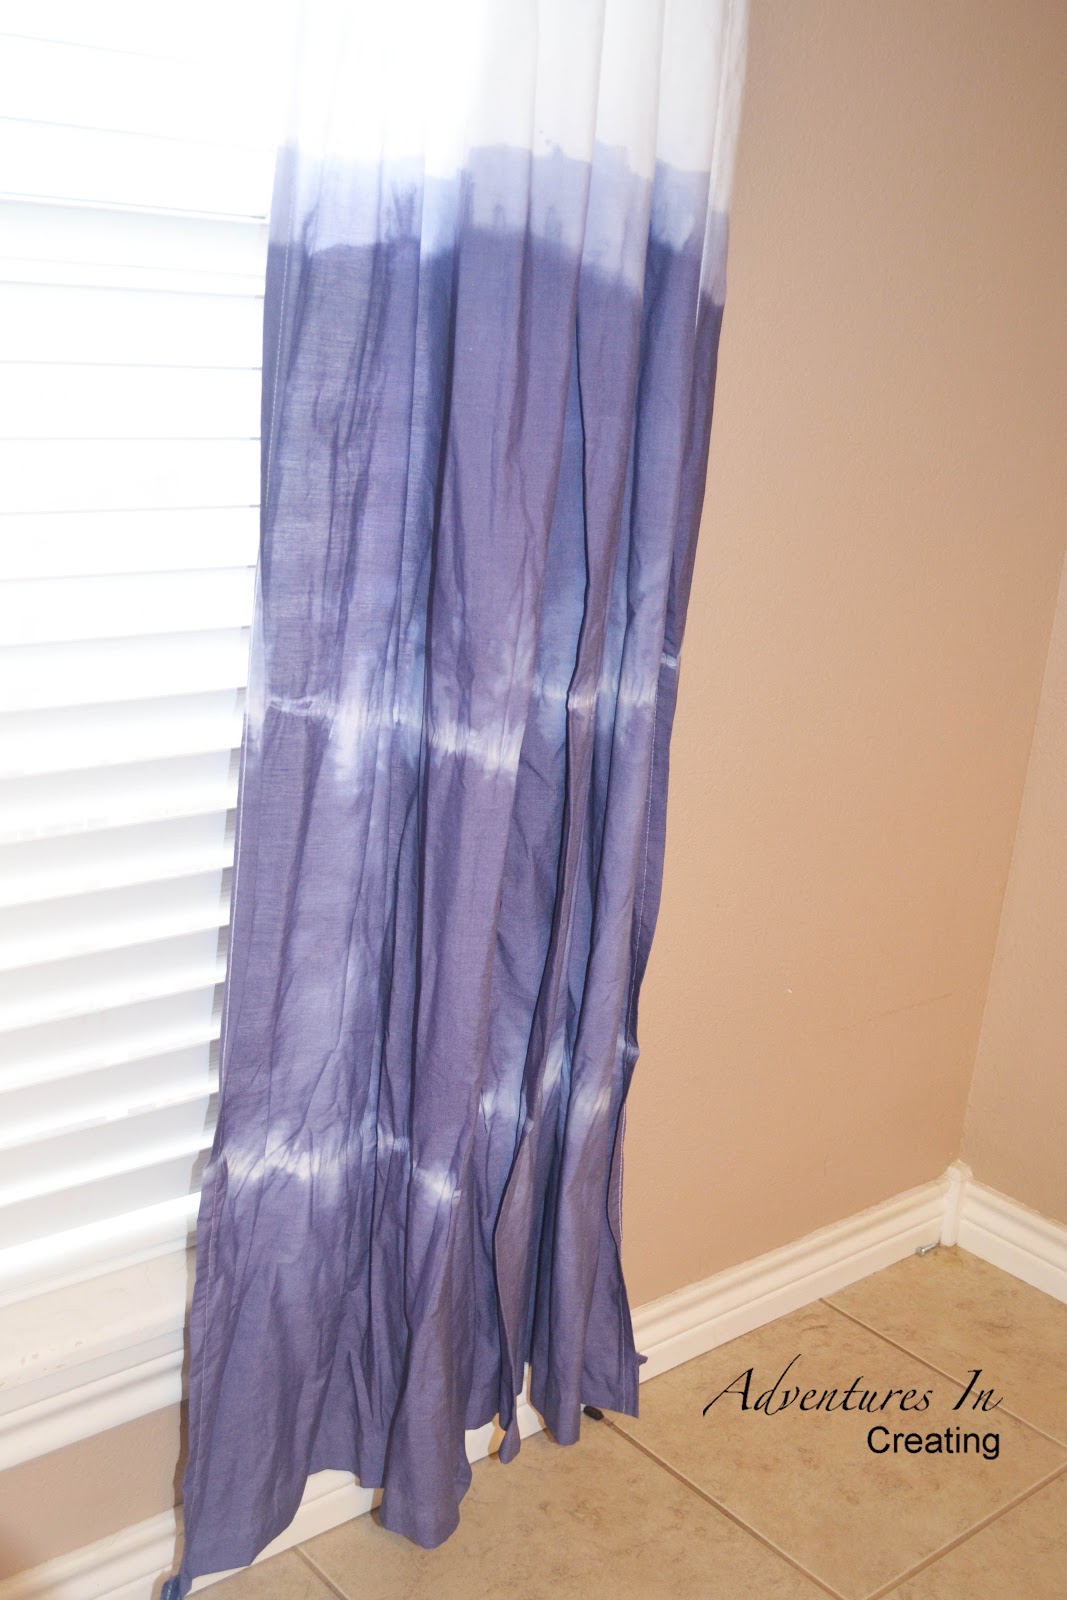
I'd been wanting to try dip dying ever since I saw some inspirational ideas on Martha Stewart a while back. I mean, the last time I had tie dye'd anything was in Girl Scouts a gazillion years ago. I've been wanting to make some curtains for this area for a long time so I went forth and conquered!
I was a little intimidated because of the possible mess and Smurf Blue stained hands but the process wasn't as scary as I thought it might be.
I was a little intimidated because of the possible mess and Smurf Blue stained hands but the process wasn't as scary as I thought it might be.
I started by buying some some cheap twin size sheets at Walmart to use for the curtains like I've done before and got to work. I hemmed the sheets to the length I needed and cut open the large top hem so I could string the curtains onto the rod.
Then I gathered my supplies for the dying. I found a great tutorial from Rit Dye here. Basically all you need is fabric dye, salt, water, a large bucket, rubber gloves, a spoon, and a plastic drop cloth to catch drips.
Then I used rubber bands to cut off the parts I didn't want dye'd. Notice how I have 3 sheets? I bought an extra one for possible mess ups (which I did end up needing).
Then I mixed the dye according to the directions on the bottle while trying really hard not to spill any in the kitchen before carrying it out to the garage.
Then just let my fabric soak. The directions say 10 minutes but I left it in for about 15 minutes to achieve a darker shade of blue.
Next I hung the curtains out to dry. I had to take a sneak peek during this process- I was worried my rubber bands weren't tight enough and that the blue dye may have seeped through. But in the end my worries were unfounded! And luckily my hands were spared any blue dye.
Here they are hanging in our kitchen!! I like how they are light and airy, casual and fun. I like the softness they bring to this wall. Something it desperately needed.


The cost for this project was practically nothing. The sheets were $6 each and the dye was only $2-3 and can be found at your local grocery in the detergent section. I bought mine at Walmart. All the other supplies I had on hand.
And the overall dying process didn't take as long as I expected- maybe an hour. That included the mixing and dipping. It took a while to get the rubber bands placed where I needed though.
So if your looking for one of kind, unique, and inexpensive curtains this technique could be for you!


What do you think? Have you ever dye'd anything?
Monday, October 17, 2011
DIY Super Cheap Metallic Pattern Curtains
Ok, when I say cheap I mean super cheap- way cheaper than you might think. I'm talking $5 per panel cheap. I've been searching for some nice looking inexpensive curtain panels for our living room. I wasn't looking for anything super fancy, just something simple and classic. My search wasn't turning up any options. I first looked at West Elm, Pottery Barn, and Crate and Barrel for ideas of what is out there. Then looked at places like Ikea and Target to see if I could find something similar in style but for less $$$.
But even my usual go to places for high style for less price weren't giving me any options I thought would work either. My problem is that I need a lot of panels- 5 to be exact for our living room. So that can add up quickly.



But even my usual go to places for high style for less price weren't giving me any options I thought would work either. My problem is that I need a lot of panels- 5 to be exact for our living room. So that can add up quickly.

So while I was at Walmart the other day I noticed that their Mainstays cotton sheets came in a lot of colors. And you can buy them separately, not in a full set as most sheet come. I had used sheets for Con-Man room with some success and thought these were my answer.

So I bought 5 of them in Navy Blue for $5 each and hung them up in the living room. Later that evening when the Hubs came home he noticed them saying- "These are kind of plain don't you think?" Whoa- he never comments on any of my projects other than a smile and eye roll. This was serious. I mean, they are kind of plain because they're sheets.... not curtains. So what to do??
I had a large Royal Design Stencil that I won from Made By Girl that I had been meaning to use in our bedroom. Maybe this was the perfect time to try it out. Though most people use them on the was I figured it was ok to use it on fabric.
Using some leftover Poly acrylic paint, plastic drop cloths, and the brush they provided I got to work.


The process was pretty simple. I started in a corner and worked my way over. The stencil has guides that show you where to overlay it next. After a while I had this:

And just a warning (they might have this on their website or something) don't use a roller when using the clear lacquer. It might be ok to use on a wall with latex paint but I tried rolling the lacquer on first with a roller and got this:

It bled through really badly even though I tried to roll most of the lacquer off. Needless to say that corner went in the very back on the bottom. After I learned that lesson I used the brush they provided and got this:

So much better! It took longer (5 hours for all 5 panels) but the result was well worth it.
Once I was finished and all had dried I pulled the panels off the plastic drop cloth, it stuck a little bit but came off clean. This is when I noticed a happy accident.
The front of the panel had the design I painted, a subtle patten like I had wanted.

But the back is where I got a real surprise:

Apparently when the cloth stuck to the drop cloth some of the plastic must have stuck on to it, giving me a metallic pattern. Cool!
I liked this even better than the original design I had intended- so I hung them with the "back" facing the front. It's a pretty cool effect. It's still subtle- the light catches the design at different times of day; but it's noticeable and really cool!


I hung the curtains higher than the windows. Our ceilings are really tall, so I like the height the curtains gives the room. Not bad for $5 sheet right? Now the hubs approves!


So if you want to try this yourself here are my tips:
- Use the fat bristle brush intended for stenciling.
- Use the thick lacquer clear gloss (mine was semi gloss)
- Use a plastic drop cloth, not a fabric one
- If you need curtains that block light, you can use the white or same colored sheets as a liner
- Don't have a stencil? Even if you decided to buy one you still come out on top money wise if you use sheets because they are so inexpensive. Plus you could use the stencil for other projects! Worse case scenario you could always try to make a stencil or free hand a design like I saw here
Total Cost: Sheets $25 for 5 flat sheets
Rings $25 for 5 sets
Rod- Free! Came with the house
Lacquer- leftover from another project
$50 for a wall full of curtains ain't to shabby.
I'd love to hear if anyone else tries this out!
And last week some of you were asking about the orange chairs. While I do like the blue and orange combo the fabric on the chairs is not in the best of shape- stains, coming off in a few spots- things you would expect from vintage furniture. They're working good for now but I'm going to reupholster them sometime in the future.
Sunday, June 13, 2010
Curtain Rods!!
Finally! Finally I used my new welder- yay! I had been thinking about the Fleur De Lis Fence Rails I mentioned in an earlier post that I've been carting around for the last 2 years. I decided it was finally time to use them or lose them. A little back story about the fencing rails and why I love them so much. Besides the fact that they are Fleur De Lis' they have a really cool rusty patina that I love. They came from a fence that surrounded the parking lot of my old job. I would walk by everyday and gaze at them.

One morning as I walked to work I noticed someone had pulled two of them off. And one other one had been tampered with as well. Hmmm, what's a girl to do? Well I did nothing about it for over a week. And they were still there- calling my name. Confession time: one day after work I decided to go for it. I drove up, threw the 2 on the ground into the car and pulled (yanked..) the third off the fence! Was this wrong? Maybe, hindsight is 20 x 20. The fence overall is still fine, I'm not the one who pulled them off to begin with. So really I was just picking up litter of the street. And now I had some iron rails to do something cool with!
But what? I've been thinking about replacing the curtain rods in our living room for a while now. I've had them since college and they're not bad looking but nothing fancy. And they're all bent up from the many apartment moves in college. So I decided it was time for replacing.


I have 2 windows in my living room, one large and one small. I thought I could weld 2 of the rails together with the Fleur De Lis at the ends as finials and the third I might be able to find a matching Fleur De Lis to weld onto it for the smaller window.
I had to cut the rails to size to fit the windows. So I brought out my trusty Dremel Tool. I LOVE my Dremel. I was able to cut the rails cleanly easily.

Next I used my Dremel to grind to rust off of the edges. This way I'll be able to make better welds on clean steel.

See? Shiny and new!

Here's a shot of the bar once I cut the unwanted portion off.

Once I had all my rails cut to size it was time for the welding! I hadn't used this welder before so I wasn't sure how it would work. Plus I hadn't welded in a long time anyway- so I was pretty rusty. I had some trouble at first, the welder didn't seem to be working and I couldn't figure out why. After a while I realized it was having trouble sending the electric current through the metal because of the rust. It took awhile to warm up but once it got going it worked great.

Here's a shot of the 2 rails welded together to make one long one for the large window.

I was able to find a matching finial, it was only $1.50. Score!

If you happen to be a professional welder you might say the weld above is pretty ugly. And you would be right. This party gave me some trouble for whatever reason, but I was able to grind it down and smooth it out.

I needed some paint to match my new finial to my rusty old ones. This is the best Home Depot had to offer; if anyone has any other sources I'd like to know because I wasn't completely satisfied with the end result.

I also bought some new hangers for the curtain and painted those as well. I probably should have put some paper down but oh well- the rain will wash it away.
Side Note: If you are going to spray Spray Paint into a styrofoam cup; say so you can use it to paint the hooks that are already screwed into the wall- DON'T. Use a real plastic holder or something! Because the paint will eat through the cup and drip all over the floor. Then you will have to run to the kitchen with paint dripping everywhere, then run back and quickly clean up the paint before it dries and ruins your floor. I'm just sayin....

And viola! Finished custom curtain rods!

I really like how they came out, the brown complements the curtains and paint much better than the black ones I had before.

Can you tell which is the bar I "helped" off the fence?

I always try to use found objects in my projects but this could easily be done with new materials. The steel shop I bought the finial from sells the bars for $6.50 for a 24' long piece. That's so cheap! I may be redoing all my curtain rods!
Subscribe to:
Posts (Atom)