That's kind of how I was about Eames Chairs. I've talked a lot about Eames furniture on the blog before. It's an obsession that started in design school and grew after interning at a Herman Miller Dealership. I loved the modern look and all the bright colors. But what I've always wanted was a genuine vintage piece to call my own. And if you know me I also did not want to pay big bucks for it. ;)
Showing posts with label dining room. Show all posts
Monday, March 24, 2014
Capturing Your White Whale
That's what I feel like- like I've finally tracked down and reeled in a piece of furniture I have been lusting after for years- like since college. I don't know if Captain Ahab ever caught Moby Dick- I actually have not read that monster of a book. But I can imagine his plight. Always looking, keeping his eyes peeled every moment for an opportunity to catch his prize.
That's kind of how I was about Eames Chairs. I've talked a lot about Eames furniture on the blog before. It's an obsession that started in design school and grew after interning at a Herman Miller Dealership. I loved the modern look and all the bright colors. But what I've always wanted was a genuine vintage piece to call my own. And if you know me I also did not want to pay big bucks for it. ;)
Labels:
blue,
dining room,
eames chair,
kitchen,
vintage,
white while
Tuesday, January 21, 2014
Modern Rustic Beach House Design
So what is the deal with the weather lately? Here in OK we had a beautiful weekend- then the last two days have been crazy cold again! And everywhere else it seems to be snowing- go away already winter! I'm ready for warmer temps! I really need to move somewhere tropical because I can't handle anything below 70.
Anyway- if you follow me on Instagram you probably saw me hinting around to a design project I was fortunate be given recently. The project was for a couple in California who purchased a vacation rental in a seaside community in Northern California. Gorgeous. Serene. Jealous. Well I'm jealous of it anyway.
But at least I got to be a part of it by choosing the furniture for it. The couple wanted a modern look to fit the house but wanted a rustic relaxing feel as well. They requested I choose furniture only from certain websites so they could order the furniture easily and have it installed.
First up was the living/ dining sitting area.
There were also two guest bedrooms that needed attention as well. I had two options to share for them:
Option 1:
Then after some tweaking and editing their final decision:
Anyway- if you follow me on Instagram you probably saw me hinting around to a design project I was fortunate be given recently. The project was for a couple in California who purchased a vacation rental in a seaside community in Northern California. Gorgeous. Serene. Jealous. Well I'm jealous of it anyway.
But at least I got to be a part of it by choosing the furniture for it. The couple wanted a modern look to fit the house but wanted a rustic relaxing feel as well. They requested I choose furniture only from certain websites so they could order the furniture easily and have it installed.
First up was the living/ dining sitting area.
They had existing couches and an existing dining table they requested I work with. The area is open with a sitting area complete with fireplace, dining space with office area, and living room with expansive windows with a beautiful view.
In the end we switched a few things up due to budget concerns and their personal tastes. Here is how the final design turned out:
Option 1:
Option 2:
And finally the master suite. There was a large window they were hoping to have some sort of seating underneath. There were a lot of doors in this room that we had to work around but I think it turned out well.
This was a fun project and I am hoping they send me pictures when everything is installed!
And I think that this goes to show that you don't need a ton of money or high end furnishings to create a beautiful cohesive home.
Till Next Time!
Sunday, September 29, 2013
Reclaimed Gym Floor Dining Table
Yes you read that correctly- GYM FLOOR DINING TABLE FINISHED!!!! Excuse me if I'm a little excited about this particular project because I've only been working on it for well over a year.
TA-DA!!
If you're not up to speed on the fabulousness that is the table see these posts:
Labels:
basket ball wood,
dining room,
gym floor,
reclaimed,
table,
welding,
woodwork
Tuesday, September 24, 2013
The Old Switcheroo
Do you ever switch furniture around in your house to achieve a new look of feel? This past weekend I did some switching around in preparation for the new dining table that I will (hopefully, crossing fingers, praying) done with this week.
First change is to our bedroom. I switched the out the white bank box console for the credenza I bought a while back. It matches the dresser I've been using, I like the warm wood, and I think we'll use it more than the bank boxes in the bedroom.
And I love love love it with my new blue chair!!! Gorgeous~~~ I still love the grey slipcovered one but I felt like the blue went better with the room scheme. The grey chair is currently in our dining room, not sure where it's new home will be. This is what happens when you have a chair fetish, it's a sickness really.
The other change I made in the bedroom is switching up our end tables. I placed the new cherry table I won at our family reunion on my side of the room and flipped the marble top one to the Hubs side.
And another thrifty find- this awesome brass plate! I had seen it in one of the shops in town and finally broke down and bought it.
And you can see here that I am letting you in on a dirty little secret: I never made the upholstered footboard for our bed. Getting on that ASAP!
So those are the bedroom changes, here is the dining room with it's new bank box credenza:
As I mentioned earlier hoping to have a new table in here soon! Con-Man will loose his racetrack space but oh well for him! And since I no longer need that empty spot in the credenza for the TV box I'm thinking it will be a new wine storage area. Yep, always need more of that!
Do you ever rearrange your furniture for a new feel? Or go "shopping" in your house for new items??
Labels:
bank boxes,
bedroom,
credenza,
dining room,
industrial,
mid century,
room redesign
Monday, September 3, 2012
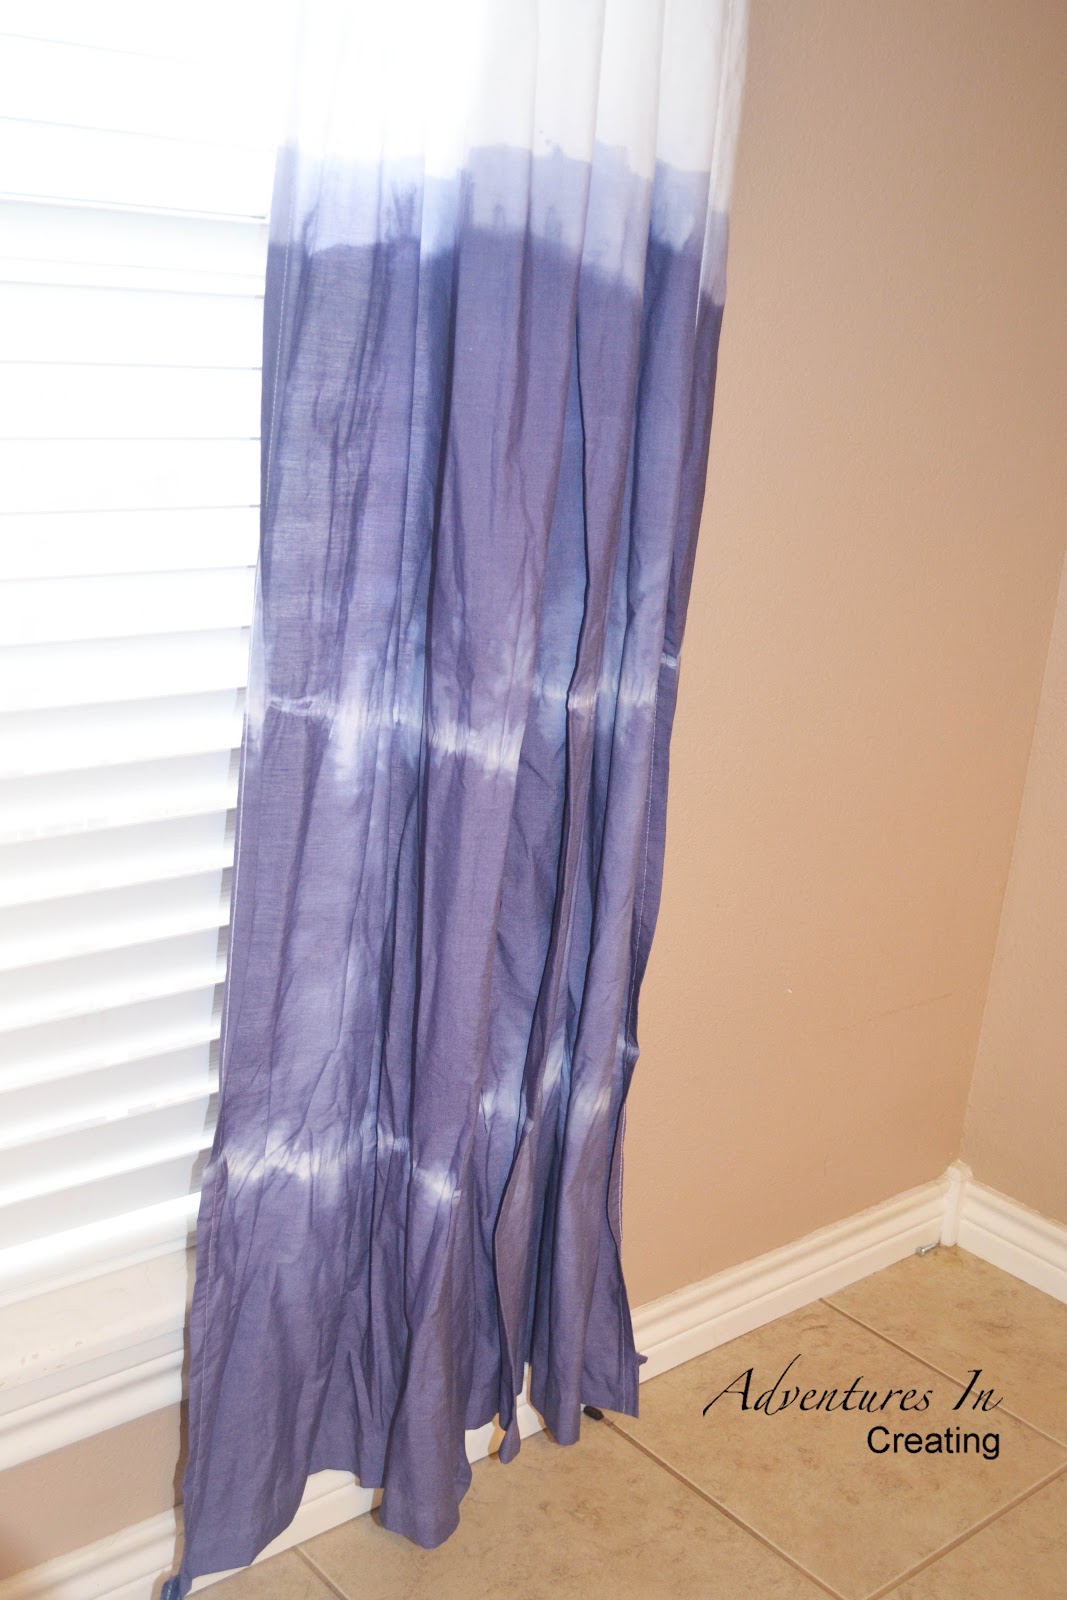
Easy Breezy Dip Dye Curtains
Hello All! I hope everyone is having a great Labor Day Weekend!
I'm finally back with a DIY project to share with you. Way back in the day; when we first moved in to our rental here in Oklahoma, I shared our kitchen dining area with you in our house tour. I had a few ideas to spruce it up and succeeded in changing up the light fixture but progress stopped there.
Until Now! Check it out-
I'm finally back with a DIY project to share with you. Way back in the day; when we first moved in to our rental here in Oklahoma, I shared our kitchen dining area with you in our house tour. I had a few ideas to spruce it up and succeeded in changing up the light fixture but progress stopped there.
Until Now! Check it out-
I'd been wanting to try dip dying ever since I saw some inspirational ideas on Martha Stewart a while back. I mean, the last time I had tie dye'd anything was in Girl Scouts a gazillion years ago. I've been wanting to make some curtains for this area for a long time so I went forth and conquered!
I was a little intimidated because of the possible mess and Smurf Blue stained hands but the process wasn't as scary as I thought it might be.
I started by buying some some cheap twin size sheets at Walmart to use for the curtains like I've done before and got to work. I hemmed the sheets to the length I needed and cut open the large top hem so I could string the curtains onto the rod.
Then I gathered my supplies for the dying. I found a great tutorial from Rit Dye here. Basically all you need is fabric dye, salt, water, a large bucket, rubber gloves, a spoon, and a plastic drop cloth to catch drips.
Then I used rubber bands to cut off the parts I didn't want dye'd. Notice how I have 3 sheets? I bought an extra one for possible mess ups (which I did end up needing).
Then I mixed the dye according to the directions on the bottle while trying really hard not to spill any in the kitchen before carrying it out to the garage.
Then just let my fabric soak. The directions say 10 minutes but I left it in for about 15 minutes to achieve a darker shade of blue.
Next I hung the curtains out to dry. I had to take a sneak peek during this process- I was worried my rubber bands weren't tight enough and that the blue dye may have seeped through. But in the end my worries were unfounded! And luckily my hands were spared any blue dye.
Here they are hanging in our kitchen!! I like how they are light and airy, casual and fun. I like the softness they bring to this wall. Something it desperately needed.
The cost for this project was practically nothing. The sheets were $6 each and the dye was only $2-3 and can be found at your local grocery in the detergent section. I bought mine at Walmart. All the other supplies I had on hand.
And the overall dying process didn't take as long as I expected- maybe an hour. That included the mixing and dipping. It took a while to get the rubber bands placed where I needed though.
So if your looking for one of kind, unique, and inexpensive curtains this technique could be for you!
Labels:
blue,
craft,
curtain rods,
dining room,
diy,
paint,
Rit Dye,
sewing,
tie dye
Friday, July 13, 2012
Reclaimed Basketball Wood Dining Table Progress
Remember when I found these awesome sheets of basketball flooring that was being thrown away? No? Well that's ok because it was months ago and I haven't said much about them since!
My idea is to turn them into a dining room table; they are solid maple so I thought it would be pretty cool to make something like these:
I had lofty visions of at least getting the tops finished then weld the bases later; after Tiny Falcon #2 is born. Well... I'm due in 2 weeks and that has not happened. We don't necessarily need a dining room table but I did need Con-Man's Big Boy Room finished, and finish the new nursery (pics next week!). And the fact that they limited the hours in the wood shop on base (thanks a lot government cut backs!!!) I haven't had the time I thought I would to get these bad boys in shape.
But here's what I've been doing with them in the meantime.
The first thing is taking them sheets apart. Each one is 5' x 5' and I need them broken down in order to sand and prep them for their final table top status. I knew it would be a pain but geeze...
They are held together in the back by planks of wood nailed to the maple. Lots of nails.
Neither I nor my friend who works in the wood shop could figure out an easy way to take them out. The nails are curved inside the wood so a regular hammer wouldn't take them out. So I had to snap the sharp ends off with a metal cutter. Fun times.
Once the pointy part of the nails were gone little nubs were left behind which I have to grind down further.
After all that I started sanding the finish off. I was going to use the planer for this but with the nails still in the wood it could have ruined the machine- so sanding it was.
So this:
Becomes this:
Which eventually becomes this:
And leads to this: arms covered in saw dust making me look even paler than I am.
Pretty much all the wood has been sanded down. The next step is getting all the gunk off the edges. It's a mix of dust, dirt, and glue. Gross. I've been scraping it off down piece by piece.
I probably won't be finished when I originally wanted but it's a good start. I'm thinking I can squeeze in 1 or 2 more work days before my due date. Who knows- maybe I'll even be able to glue some slabs together!
Have you ever had a project put on hold?
Labels:
basket ball wood,
dining room,
diy,
gym floor,
rustic wood,
table,
woodwork
Monday, November 14, 2011
Do You Houzz??
Lately I've been hooked on the Pinterest craze along with everyone else. I love browsing around looking for ideas and cool projects. Another site I'm easily becoming obsessed with as well is Houzz. Have you heard of it?
If you're looking for ideas for you home or just like looking at beautiful homes this is the website for you. I can look at these photos all day long and dream (and drool). I want them all!
You can search by room or style. They have almost every style you can think if; modern, traditional, Spanish, ect. After browsing you can create "Ideabooks" and save the images you like in each one. You're able to put notes about what you like about the room.
What even better is that each photo contains information about the room provided by the person who uploaded it; usually the architect or designer of the home. Some of the photos have information and pricing on the furniture and lighting in the room; even what paint color is used on the walls. Pretty awesome!
And it's free!! So, do you think you'll Houzz??
Labels:
creative,
decor,
design ideas,
dining room,
info,
inspiration
Saturday, October 1, 2011
Showing Some Love to Pallets
I don't know if people are tired of seeing projects made of pallets but I certainly am not. I'm not sure if its the natural patina of the wood, the linear structure, or just the fact that you can find these things for free that really draws me to them. There seems to be newer and cooler ideas of what to do with old pallets everyday!
I guess I'll start off with the queen of pallets; Donna from Funky Junk Interiors. Have you seen all the stuff she's made with pallets? Here's her famous pallet desk:
Donna has made tons of other cool stuff with pallets. She even has a post on how to find and use pallets.
After you read that you'll be ready to scavenge out and get some pallets of your own. Here are some more palle-riffic ideas:
A Spice Rack:
I guess I'll start off with the queen of pallets; Donna from Funky Junk Interiors. Have you seen all the stuff she's made with pallets? Here's her famous pallet desk:
Donna has made tons of other cool stuff with pallets. She even has a post on how to find and use pallets.
After you read that you'll be ready to scavenge out and get some pallets of your own. Here are some more palle-riffic ideas:
A Spice Rack:
A lounge-y Pallet Sofa:
Office furniture made from pallets:
A Book Carosel: (An Industrial Spool, technically not a pallet but it's cool)
Outdoor Hanging Garden:
Outdoor Lounge Chairs:
And what I'm hoping to make using pallets- A formal dining table!
I can build the frame out of steel with my welder, find me some pallet wood, and bam! Awesome dining table!
The weather is getting cooler so it will be nicer to be outside welding. My hope is to get this started and finished before Thanksgiving. We shall see if that actually happens.
What are your thoughts on pallets? Love em? Hate em? Sick of seeing them everywhere?
And don't forget there's still time to enter the Giveaway for the Dremel Saw Max! (Ends on October 4, 2011)
Labels:
dining room,
pallet,
woodwork
Subscribe to:
Posts (Atom)