Blog Silence- that's where I've been lately. I have an awesome furniture makeover to share but haven't even blogged about it yet! But it's for good reason. When it rains it pours, feast of famine, and all those cliches have been my life lately.
After a long dry spell I have been fortunate enough to score some design jobs as of late and of course they have tight deadlines. Looking forward to sharing those soon!


Showing posts with label craft. Show all posts
Showing posts with label craft. Show all posts
Monday, January 13, 2014


Thursday, December 19, 2013
Vintage Book Letters
Hey All! Is everyone gearing up for Christmas? We are but aren't. I'm so ready for the holiday but I still have shopping to do! Ack!!
In the meantime instead of getting things done around the house... I've been trying to get some items into the shop for last minute Christmas shoppers. You have most likely seen these before:

In the meantime instead of getting things done around the house... I've been trying to get some items into the shop for last minute Christmas shoppers. You have most likely seen these before:

Similar ones were sold at Anthropologie and other specialty stores this season. They are super cool but were super expensive (to me at least). I knew it was a project I could tackle myself.
Monday, January 28, 2013
Valentines Thumbprint Hearts
Valentines is coming up! Have you bought your sweetheart a present yet? Me neither...I'm such a procrastinator. But; when I do have my present, I have a quick, easy and relatively inexpensive way to personalize your gift wrapping this year. I feel very Martha Stewart-ish!
We've all seen the thumbprint jewelry online- it comes in gold and silver, necklaces and bracelets. Well what about making your own version out of clay using your own finger prints?

We've all seen the thumbprint jewelry online- it comes in gold and silver, necklaces and bracelets. Well what about making your own version out of clay using your own finger prints?

Wednesday, October 31, 2012
A Halloween Quickie
I know I said I'd be light on projects but I can't help myself. I'd rather be painting and making a mess in the garage than packing. I can't stand packing! Especially since now I have to pack for not only myself but for the 2 boys, our dog and cat (and occasionally the Hubs but don't tell him I told you that.)
Anyway- Happy Halloween!! I thought I could take down my Fall Wreath for one night to celebrate the evening. I saw this idea on Curbly and knew I had everything on hand to make it.
Anyway- Happy Halloween!! I thought I could take down my Fall Wreath for one night to celebrate the evening. I saw this idea on Curbly and knew I had everything on hand to make it.
Monday, September 17, 2012
Hittin the Road
I've been wanting to do something a little special for the Con-Man lately. He has a new baby brother who's commanding a lot of my time and he's been handling it really well. He loves being a big brother and has been helping me out a lot but I know he misses being the center of attention.
We've established that Con-Man loves cars. His room had a transportation theme, everything he got for his birthday was car related, and he has more MatchBox cars than he knows what to do with.
We've established that Con-Man loves cars. His room had a transportation theme, everything he got for his birthday was car related, and he has more MatchBox cars than he knows what to do with.
Monday, September 10, 2012
Fall Wreath My Way
It's Fall!! Here in Oklahoma we actually had temperatures below 100 degrees!! The highs have been in the 80's. I feel like I'm freezing and I'm loving it.
Also, as mentioned before I love Fall because Fall means Football. And just because we live in Oklahoma now doesn't mean I can't show my Louisiana Pride.
And to show that pride to all my neighbors (mostly OU fans) I made an LSU and Saints Wreath!

I started with foam letters from the craft store. They were less expensive than the wooden ones and cuter I thought.


Also, as mentioned before I love Fall because Fall means Football. And just because we live in Oklahoma now doesn't mean I can't show my Louisiana Pride.
And to show that pride to all my neighbors (mostly OU fans) I made an LSU and Saints Wreath!

I started with foam letters from the craft store. They were less expensive than the wooden ones and cuter I thought.

All they needed was a little paint.

I added some ribbon like my Christmas and Mardi Gras Wreaths, glued the letters on and was ready to hang.


So when our friends came over to watch the LSU Game we were ready. My Tigers won but sadly my Saints lost. But overall I had a good football weekend because I won my Fantasy Game as well! Woo!
Linking to The CSI Project!

Monday, September 3, 2012
Easy Breezy Dip Dye Curtains
Hello All! I hope everyone is having a great Labor Day Weekend!
I'm finally back with a DIY project to share with you. Way back in the day; when we first moved in to our rental here in Oklahoma, I shared our kitchen dining area with you in our house tour. I had a few ideas to spruce it up and succeeded in changing up the light fixture but progress stopped there.
Until Now! Check it out-


I'm finally back with a DIY project to share with you. Way back in the day; when we first moved in to our rental here in Oklahoma, I shared our kitchen dining area with you in our house tour. I had a few ideas to spruce it up and succeeded in changing up the light fixture but progress stopped there.
Until Now! Check it out-

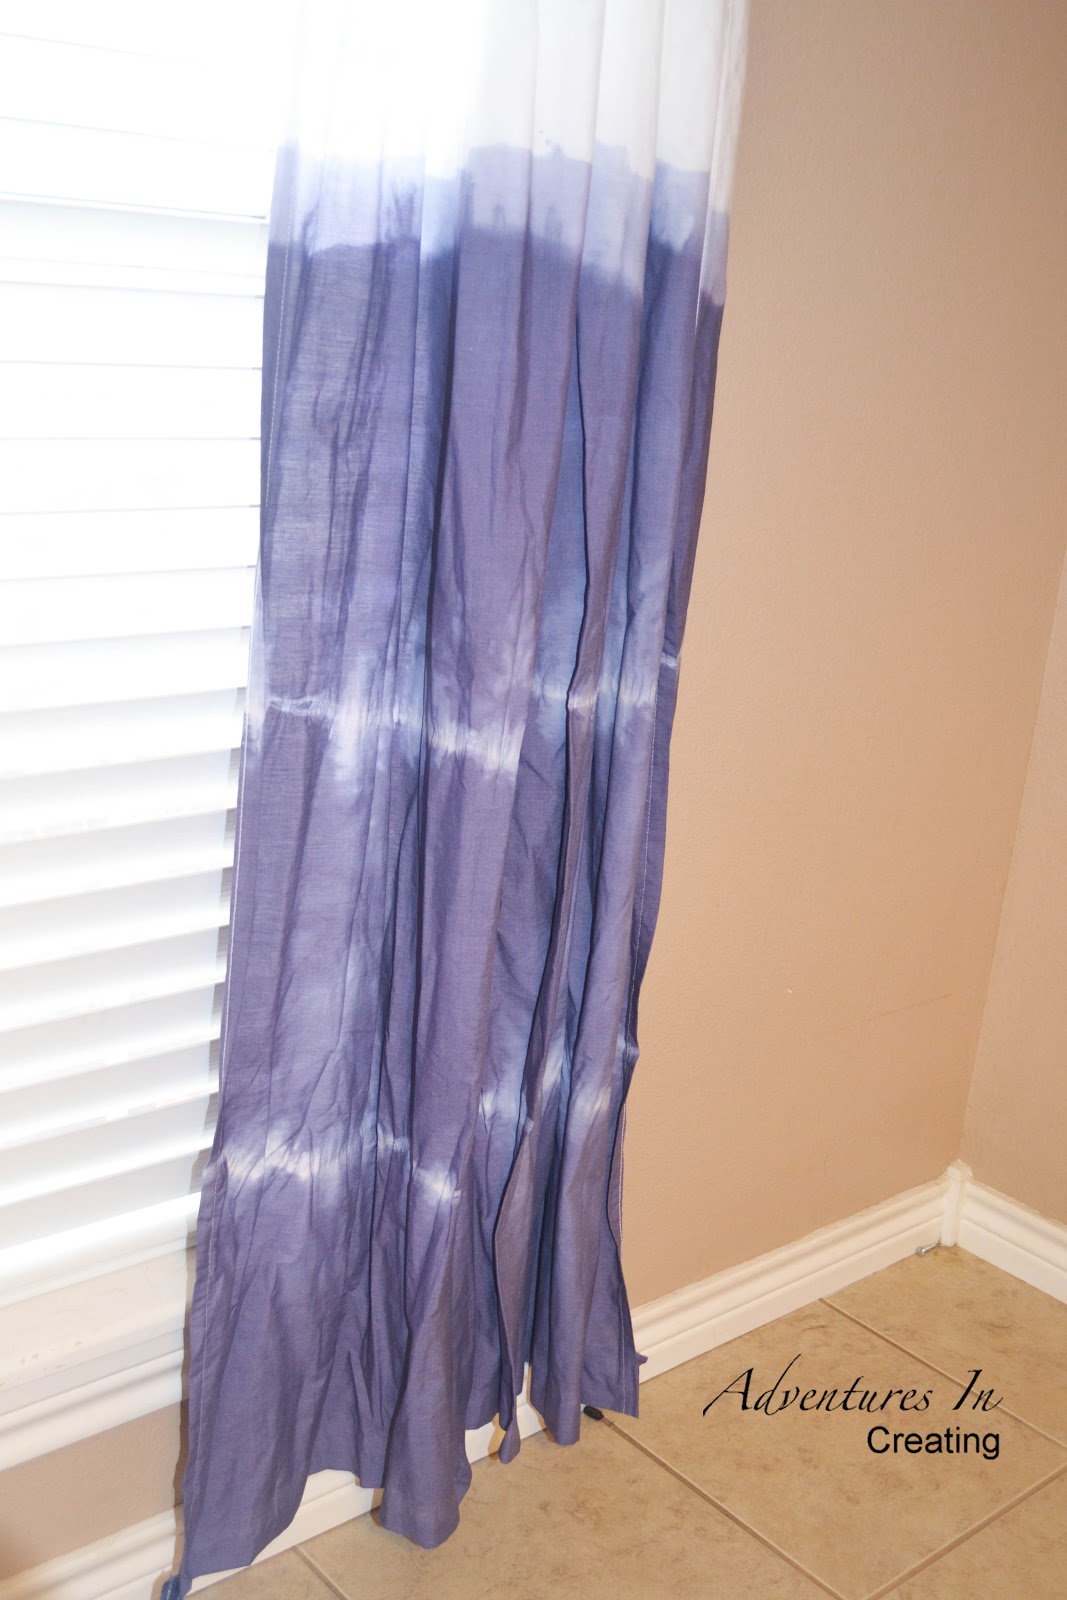
I'd been wanting to try dip dying ever since I saw some inspirational ideas on Martha Stewart a while back. I mean, the last time I had tie dye'd anything was in Girl Scouts a gazillion years ago. I've been wanting to make some curtains for this area for a long time so I went forth and conquered!
I was a little intimidated because of the possible mess and Smurf Blue stained hands but the process wasn't as scary as I thought it might be.
I was a little intimidated because of the possible mess and Smurf Blue stained hands but the process wasn't as scary as I thought it might be.
I started by buying some some cheap twin size sheets at Walmart to use for the curtains like I've done before and got to work. I hemmed the sheets to the length I needed and cut open the large top hem so I could string the curtains onto the rod.
Then I gathered my supplies for the dying. I found a great tutorial from Rit Dye here. Basically all you need is fabric dye, salt, water, a large bucket, rubber gloves, a spoon, and a plastic drop cloth to catch drips.
Then I used rubber bands to cut off the parts I didn't want dye'd. Notice how I have 3 sheets? I bought an extra one for possible mess ups (which I did end up needing).
Then I mixed the dye according to the directions on the bottle while trying really hard not to spill any in the kitchen before carrying it out to the garage.
Then just let my fabric soak. The directions say 10 minutes but I left it in for about 15 minutes to achieve a darker shade of blue.
Next I hung the curtains out to dry. I had to take a sneak peek during this process- I was worried my rubber bands weren't tight enough and that the blue dye may have seeped through. But in the end my worries were unfounded! And luckily my hands were spared any blue dye.
Here they are hanging in our kitchen!! I like how they are light and airy, casual and fun. I like the softness they bring to this wall. Something it desperately needed.


The cost for this project was practically nothing. The sheets were $6 each and the dye was only $2-3 and can be found at your local grocery in the detergent section. I bought mine at Walmart. All the other supplies I had on hand.
And the overall dying process didn't take as long as I expected- maybe an hour. That included the mixing and dipping. It took a while to get the rubber bands placed where I needed though.
So if your looking for one of kind, unique, and inexpensive curtains this technique could be for you!


What do you think? Have you ever dye'd anything?
Monday, August 20, 2012
Attempts At Craftiness
Supplies for a project I'm attempting this week. Baby steps until our real baby is older and I have time to do things again!


Wednesday, August 8, 2012
Make a Statement...
Bracelet!

One thing that having a newborn has done is made me focus on smaller projects that I have been putting off for a long time. I have all these ideas in my head but don't always get to them.
This is one project I can cross off that list.
A friend of mine gave me a few small decorative tiles a long time ago- knowing that I like things like that. I hadn't done much with them until now. My favorite one is a Fleur De Lis one (I love Fleur De Lis- they remind me of home in Louisiana!). I thought it would be cool to make a piece of jewelry out of it.


One thing that having a newborn has done is made me focus on smaller projects that I have been putting off for a long time. I have all these ideas in my head but don't always get to them.
This is one project I can cross off that list.
A friend of mine gave me a few small decorative tiles a long time ago- knowing that I like things like that. I hadn't done much with them until now. My favorite one is a Fleur De Lis one (I love Fleur De Lis- they remind me of home in Louisiana!). I thought it would be cool to make a piece of jewelry out of it.

I've dabbled in jewelry making before but this is my favorite piece so far!
To make the tile a little more decorative I decided to add some glass beads around the edges to finish it off. I used Gorilla Super Glue and some glass beads I bought at the craft store.

Then just glued them all around the edge of the tile.

To make the leather wrap I simply cut out a piece of leather to the size and shape I needed. Once the beading around the tile was done and dry I needed to adhere the tile to my leather bracelet. I used snaps and Gorilla Glue Epoxy for this task.


I used the Epoxy to glue one part of the snap onto the tile.

Then connected the snap into the leather band.

After snapping my tile onto the band I treaded a piece of suede ribbon through the leather to use to tie the wrap down.

Then it was done!

I used the suede ribbon to tie the bracelet off.


What things have you been crossing off your list lately?
Wednesday, August 1, 2012
Aviation Inspired Onsies
Happy Wednesday Everyone! I didn't think I'd be back to crafting anytime soon but I'm back at it this week. Sawyer has been a really good baby and we have had family in town helping out- so I've had some time to get a few things done.

One of my good friends here in Altus is expecting a baby in a few weeks- a boy! He and Sawyer are going to be good friends. Her husband is a pilot in the Air Force; so I thought what better baby gift than one inspired by planes. I was supposed to work on this project last weekend; but Sawyer had other plans.
I found an image of an airplane online and resized it in Photoshop to the size I needed. Then printed it and traced it onto my felt.


Just Chillin' Like a Villian
I found an image of an airplane online and resized it in Photoshop to the size I needed. Then printed it and traced it onto my felt.


For the second shirt I did the same thing; found an image of a vintage pilots hat and an image of aviator sunglasses. Photoshopped them up and printed them out.


Now it's just a waiting game for the little guy to show up!
Along with the Onsies I'm also giving my friend a few new mom survival gifts- a cute water bottle, tea, lotion & chapstick, breakfast bars and some magazines. Just a few things to help her get through those late night feedings and early mornings.
Hooray for babies!!
Wednesday, June 20, 2012
Tiny Falcon #2's Nursery Inspiration
I can't believe how quickly my due date is approaching. July 28th is right around the corner!

I had a little panic attack this weekend decided it was time to get started on poor Baby #2's room. We are using the room that was our office; combining it with our guest room (sorry Mom and Dad) and making it the New Baby's Room. I comissioned the Hubs to help me get the rest of the office stuff out of there and put the crib together over the weekend.
I'm using a lot of things from Con-Man's old nursery. His bedding, curtains, and some of the art work:


Here's how it's looking so far- not done at all but it's a start!


Me 2 weeks ago at my parents house
I'm using a lot of things from Con-Man's old nursery. His bedding, curtains, and some of the art work:

Re-using his old bedding

Pics from Con's old room. The dresser is now our TV credenza. I'm going to use the same curtains.

Con's old art work and shelf in Baby #2's new room.


No baby in here yet, just baby stuff! I'm going to use the vinyl lettering I won from the DIY Club Contest above the crib.

Using the moon theme as a jumping off point I thought it would be cool to use some paper lanterns above his crib. One large white one (the moon) and stars. Something like this:

I've ordered a few but the only small stars I can find don't come in the right colors. I might just order them and see about spray painting them (has anyone done this before? How does the paper hold up?) I have some pendant light wires from Ikea so I'll light up the moon and one or 2 of the stars.
Since we repurposed Con-Man's old changing table into our new entertainment center I needed a new changing table for Tiny Falcon #2. I found a dresser at a local thrift shop for $100. It was a little more than I wanted to pay but we don't have a lot of choices out here in the middle of nowhere so people charge what they want. It did come with a large mirror, is solid wood, and has really deep drawers so it's not the worst deal I've gotten.

The top has some water marks on it. I'm considering trying to refinish it even though you can't see it right now with the changing pad and diaper supplies covering it up.

Bummer!
I'd like to do some shelving above the dresser, no final ideas yet but I did see this on Pinterest the other day.

They are outdoor garden baskets from Lowes and I have 1 already. I'd do another color besides pink of course!
So those are some of the ideas I have. I've also been working on the no fun stuff like washing all the old baby clothes and organizing them.
And you might be wondering what the heck happened with Con-Man's big boy room? I did all these projects for it but never showed the final result. Well never fear! Con-Man went to summer school yesterday and I took part of that time to clean all the toy mess and take some decent pictures of his new room.
So stay tuned next week for the reveal!
Have a wonderful Wednesday everyone!
Subscribe to:
Posts (Atom)